- [Spring] WebClient @Bean SSL 설정 2022.01.18
- [Spring] WebClient 클래스로 API 요청 2022.01.18
- [Spring Security] 사용자 로그인 상태 체크 2022.01.18
- [Spring] JSON 구조 데이터 받기 2021.11.29
- [JAVA] Date 클래스(java.sql) -> Date.valueOf(String) 2021.09.30
- [Web] Cookie (쿠키 생성, 읽기) 방법 2021.07.20
- [JSON] Java - json 파싱 2021.07.13
- Spring @Bean - 스프링 빈 2021.07.08
- [spring] mybatis 설정 2021.03.30
- [03/07] Spring (mysql 연결), Mysql 5.7 CE버전 2021.03.07
- [ Intellij] 4. Spring MVC + Maven 설정 후 Tomcat 연동 2021.02.17
- [Intellij] 3. Spring MVC 에 Maven 추가 2021.02.17
- [Intellij] 2. Spring MVC 프로젝트 설정 2021.02.17
- [Spring] json 형식 주고 받기 2021.01.09
- [Spring] 컨트롤러에서 파라미터를 받는 방법 2021.01.07
- [Spring] Annotation "@" 2021.01.05
- [spring] 2. 한글 처리 filter (web.xml) 2020.06.09
- [Spring] 의존 주입 - 작성중 2020.04.21
- [Spring] 클래스 컨테이너 2020.04.20
- [spring] - pom.xml 의 dependency 2020.04.20
@Configurable
@Slf4j
public class WebClientConfig {
    @Bean
    public WebClient createWebClient() throws SSLException {
        SslContext ssl = SslContextBuilder
                .forClient()
                .trustManager(InsecureTrustManagerFactory.INSTANCE).build();
        HttpClient httpClient = HttpClient.create().secure(builder -> builder.sslContext(ssl));
        return WebClient.builder().clientConnector(new ReactorClientHttpConnector(httpClient)).build();
    }
}
'Spring Framework > Spring' 카테고리의 다른 글
| [Spring] WebClient 클래스로 API 요청 (0) | 2022.01.18 |
|---|---|
| [Spring Security] 사용자 로그인 상태 체크 (0) | 2022.01.18 |
| [Spring] JSON 구조 데이터 받기 (0) | 2021.11.29 |
| [JAVA] Date 클래스(java.sql) -> Date.valueOf(String) (0) | 2021.09.30 |
| [Web] Cookie (쿠키 생성, 읽기) 방법 (0) | 2021.07.20 |
@NoArgsConstructor
public class APIUtil<T> {

    private static ObjectMapper objectMapper;
    private static Map parameters;
    private WebClient webClient;

    @Autowired
    public APIUtil(WebClient webClient){
        this.webClient = webClient;
    }

    public Mono<T> post(Object obj, String URL, Class toValueType){
        objectMapper = new ObjectMapper();
        parameters = new HashMap<String, String>();
        parameters = objectMapper.convertValue(obj, Map.class);

        Mono<T> t = webClient.post()
                .uri(uriBuilder -> uriBuilder.path(URL)
                        .build())
                .contentType(MediaType.APPLICATION_JSON)
                .accept(MediaType.APPLICATION_JSON)
                .bodyValue(parameters) //body (MultiValueMap 사용시 500 Error)
                .retrieve()
                .bodyToMono(toValueType);
        return t;
    }
}'Spring Framework > Spring' 카테고리의 다른 글
| [Spring] WebClient @Bean SSL 설정 (0) | 2022.01.18 |
|---|---|
| [Spring Security] 사용자 로그인 상태 체크 (0) | 2022.01.18 |
| [Spring] JSON 구조 데이터 받기 (0) | 2021.11.29 |
| [JAVA] Date 클래스(java.sql) -> Date.valueOf(String) (0) | 2021.09.30 |
| [Web] Cookie (쿠키 생성, 읽기) 방법 (0) | 2021.07.20 |
*Spring Security로 로그인 한 사용자 리디렉션 (tistory.com)* - 출처 -
private boolean isAuthenticated() {
        Authentication authentication = SecurityContextHolder.getContext().getAuthentication();
        if (authentication == null || AnonymousAuthenticationToken.class.
                isAssignableFrom(authentication.getClass())) {
            return false;
        }
        return authentication.isAuthenticated();
}

  //로그인 페이지
    @GetMapping("/")
    public ModelAndView login(ModelAndView mav) {
        if(isAuthenticated()){
            mav.setViewName("/main");
            return mav;
        }
        mav.setViewName("views/login/login");
        return mav;

}'Spring Framework > Spring' 카테고리의 다른 글
| [Spring] WebClient @Bean SSL 설정 (0) | 2022.01.18 |
|---|---|
| [Spring] WebClient 클래스로 API 요청 (0) | 2022.01.18 |
| [Spring] JSON 구조 데이터 받기 (0) | 2021.11.29 |
| [JAVA] Date 클래스(java.sql) -> Date.valueOf(String) (0) | 2021.09.30 |
| [Web] Cookie (쿠키 생성, 읽기) 방법 (0) | 2021.07.20 |
JavaScript 에서 보내는 데이터
var options = [];
options.push('1123');
options.push('1159');
options.push('1300');

var formdata = {
					"date" : 20211129,
					"address" : 'busan dongrae',
					"tel1" : '010',
					"tel2" : '1234',
					"tel3" : '1234',
					"times" : options,
			}
fetch(url, {
				method : "POST",
				headers : {
					"Content-Type" : "application/json",
				},
				body : JSON.stringify(formdata),
			}).then((response) => console.log(response));
보내지는 데이터 구조 ( Json 데이터 내부구조에 Array 형이 있는 경우가 많은데 여태 통째로 String 으로 받은다음 JsonParser API로 파싱해서 사용했었음)
{
      'date' : '20211129',
      'address' : 'busan dongrae',
      'tel1' : '010',
      'tel2' : '1234',
      'tel3' : '1234',
      'times' : ['1123', '1159', '1300']
}
Spring 에서 받을 때, 보내주는 형태로 클래스를 설계하고,
주의할 점은 보내는 json key 값과 클래스의 변수명이 일치해야 자동으로 매핑
import lombok.Getter;
import lombok.Setter;
import lombok.ToString;

@Getter
@Setter
@ToString
public class SendData {
	private String date;
	private String address;
	private String tel1;
	private String tel2;
	private String tel3;
	private String[] times;

	@Getter
	@Setter
	@ToString
	public static class Times {
		private String time;
	}
}
컨트롤러에서 @RequestBody ClassName Object 형태로 받을 수 있음
@ResponseBody
	@RequestMapping(value = "test", method = RequestMethod.POST)
	public String reservation(HttpSession session, @RequestBody SendData sendData)
			throws IOException {

            "";
}'Spring Framework > Spring' 카테고리의 다른 글
| [Spring] WebClient 클래스로 API 요청 (0) | 2022.01.18 |
|---|---|
| [Spring Security] 사용자 로그인 상태 체크 (0) | 2022.01.18 |
| [JAVA] Date 클래스(java.sql) -> Date.valueOf(String) (0) | 2021.09.30 |
| [Web] Cookie (쿠키 생성, 읽기) 방법 (0) | 2021.07.20 |
| [JSON] Java - json 파싱 (0) | 2021.07.13 |
[TIP]
년+"-"+월+"-"+일
import org.junit.jupiter.api.Test;
import java.sql.Date;

public class DateTest {

    private Date date;
    private String birth_year = "1999";
    private String birth_month = "01";
    private String birth_day = "30";

    @Test
    public void date(){
        this.date = Date.valueOf(this.birth_year + "-" + this.birth_month + "-" + this.birth_day);
        System.out.println(this.date);
    }
}'Spring Framework > Spring' 카테고리의 다른 글
| [Spring Security] 사용자 로그인 상태 체크 (0) | 2022.01.18 |
|---|---|
| [Spring] JSON 구조 데이터 받기 (0) | 2021.11.29 |
| [Web] Cookie (쿠키 생성, 읽기) 방법 (0) | 2021.07.20 |
| [JSON] Java - json 파싱 (0) | 2021.07.13 |
| [spring] mybatis 설정 (0) | 2021.03.30 |
쿠키 생성
1. 쿠키를 만드는 법은 아래 처럼 javax.servlet.http.Cookie 클래스 객체를 생성한 후, 인스턴스 생성시에 쿠키의 이름이 되는 "key" 값과, 쿠키의 값이되는 "value"를 넣어준다.
Cookie cookie = new Cookie("key", "value");
2. 1번의 과정만으로는 쿠키가 http 통신을 통해 생성되거나 전달되지 않는데, HttpServletRequest 객체에 실어서 전달해야 브라우저에 쿠키가 생성이 된다.
HttpServletResponse response;
response.addCookie(new Cookie("key", "value"));
쿠키 읽기
1. 쿠키 읽는 방법
HttpServletRequest request;
request.getCookie();

for(int i = 0; i < this.cookies.length; i++) {
			if(cookies[i].getName().equals(name)) {
				return cookies[i].getValue();
			}
}
request 객체로 부터 getCookie() 메서드를 이용해서, Cookie[] 타입의 배열을 리턴 받아서 저장한다.
따라서, for 문에 돌아가는 cookies는 Cookie[] cookie 로 선언 된 객체다.
배열이기 때문에, cookies[i].getName() 을 통해 모든 쿠키의 이름을 얻어 올 수 있고, cookies[i].getValue()를 통해 값을 얻을 수 있다.
필요해서 만든 클래스
: 반복적으로 사용해야하니 좀 더 사용하기 편하게 클래스를 만들어 보았다
: 쿠키로 저장할 때, bearer 토큰을 저장해야하는 작업이 있어서, AES256 으로 암호화 하여, 저장했다가, 서버에서 처리할 때, 쿠키를 읽어서 복호화 하는 반복되는 작업에 유용할 것 같아서 만들었다.
import javax.servlet.http.Cookie;
import javax.servlet.http.HttpServletRequest;

public class CookieUtil {

	private Cookie[] cookies;
	private Cookie cookie;

	public CookieUtil() {
		// TODO Auto-generated constructor stub
	}
	// 객체 생성시에 request 객체를 받는 경우
    // 쿠키이름으로 쿠키 값을 얻을 때!
	public CookieUtil(HttpServletRequest request) {
		this.cookies = request.getCookies();
	}

    // 쿠키이름으로 쿠키 값을 얻는 메소드
	public String getValue(String name) {

		for(int i = 0; i < this.cookies.length; i++) {
			if(cookies[i].getName().equals(name)) {
				return cookies[i].getValue();
			}
		}
		return null;
	}

    // 쿠키 추가하는 메서드
	public CookieUtil addCookie(String key, String value) {
		this.cookie = new Cookie(key, value);
		return this;
	}

 	// 쿠키 추가후에 쿠키 만료일을 체이닝하는 메서드
	public CookieUtil setExpire(int period) {
		this.cookie.setMaxAge(period);
		return this;
	}

    // 쿠키 추가후에 HttpOnly 옵션을 체이닝하는 메서드
	public CookieUtil setHttpOnly(boolean setHttpOnly) {
		this.cookie.setHttpOnly(setHttpOnly);
		return this;
	}

    // 쿠키 생성을 마칠 때, 쿠키를 리턴하는 메서드
	public Cookie build() {
		return this.cookie;
	}
}
: 사용 예시
response.addCookie(cookieUtil.
						addCookie("refreshToken", refreshToken).
						setHttpOnly(true)
						.setExpire(60 * 60 * 8).build()
);'Spring Framework > Spring' 카테고리의 다른 글
| [Spring] JSON 구조 데이터 받기 (0) | 2021.11.29 |
|---|---|
| [JAVA] Date 클래스(java.sql) -> Date.valueOf(String) (0) | 2021.09.30 |
| [JSON] Java - json 파싱 (0) | 2021.07.13 |
| [spring] mybatis 설정 (0) | 2021.03.30 |
| [03/07] Spring (mysql 연결), Mysql 5.7 CE버전 (0) | 2021.03.07 |
ResponseEntity 로 api호출을 리턴 받은 후, getBody() 메서드로 json 데이터를 받았다.
JSONObject jsonObject = (JSONObject) jsonParser.parse(responseEntity.getBody());
이 때, jsonObject에서 get() 메서드로 해당 키 값을 주면, 값을 얻어 올 수 있다.
String result = (String) jsonObject.get("키 값");
만약, 해당 키 값이 json 배열형태라면, JSONArray를 사용해야하는데,
JSONArray jsonArray = (JSONArray) jsonObject.get(" jsonarray 에 해당하는 key 값");JSONArray 에 담기면, key value 가 같이 ArrayList 형태로 담기는 데 다시, jsonArray에서 한개씩 꺼내어서 파싱해야한다.
"jsonkey" : [key: value] , [key: value] 이런 형태의 데이터가 있다면,
jsonParser를 통해서 jsonObject에 담으면, 해당 key 내부에 있는 배열 모두를 하나의 value 로 인식하여 들어가고,
JSONArray 에 jsonObject를 담으면, JSONArray index 첫번째, 두번째에 각각 [key : value] , [key : value] 형태로 담긴다.
'Spring Framework > Spring' 카테고리의 다른 글
| [JAVA] Date 클래스(java.sql) -> Date.valueOf(String) (0) | 2021.09.30 |
|---|---|
| [Web] Cookie (쿠키 생성, 읽기) 방법 (0) | 2021.07.20 |
| [spring] mybatis 설정 (0) | 2021.03.30 |
| [03/07] Spring (mysql 연결), Mysql 5.7 CE버전 (0) | 2021.03.07 |
| [ Intellij] 4. Spring MVC + Maven 설정 후 Tomcat 연동 (0) | 2021.02.17 |
빈 (Bean)
- Spring IoC 컨테이너가 관리하는 자바 객체를 빈(Bean)이라고 함
- 따라서, new 객체() 는 객체라고 부르지 빈(Bean) 이라고 부르지 않음
- ApplicationContext.getBean() 으로 얻어질 수 있는 객체
빈 등록 방법
@Component 이 사용된 클래스들이 스캔되고, Bean으로 등록 된다.
@ComponentScan 이 사용된 패키지 이하의 모든 클래스 중에 @Component 가 사용된 클래스가 Bean으로 등록이 된다.
'Spring Framework > Annotation' 카테고리의 다른 글
| [Spring] Annotation "@" (0) | 2021.01.05 |
|---|
pom.xml
<?xml version="1.0" encoding="UTF-8"?>
<project xmlns="http://maven.apache.org/POM/4.0.0"
         xmlns:xsi="http://www.w3.org/2001/XMLSchema-instance"
         xsi:schemaLocation="http://maven.apache.org/POM/4.0.0 http://maven.apache.org/xsd/maven-4.0.0.xsd">
    <modelVersion>4.0.0</modelVersion>

    <groupId>groupId</groupId>
    <artifactId>demo</artifactId>
    <version>1.0-SNAPSHOT</version>

    <properties>
        <maven.compiler.source>8</maven.compiler.source>
        <maven.compiler.target>8</maven.compiler.target>
    </properties>
    <dependencies>
        <dependency>
            <groupId>org.projectlombok</groupId>
            <artifactId>lombok</artifactId>
            <version>1.18.12</version>
            <scope>compile</scope>
        </dependency>
        <!-- https://mvnrepository.com/artifact/mysql/mysql-connector-java -->
        <dependency>
            <groupId>mysql</groupId>
            <artifactId>mysql-connector-java</artifactId>
            <version>8.0.22</version>
        </dependency>


        <!-- https://mvnrepository.com/artifact/org.springframework/spring-jdbc -->
        <dependency>
            <groupId>org.springframework</groupId>
            <artifactId>spring-jdbc</artifactId>
            <version>5.2.3.RELEASE</version>
        </dependency>
        <!-- myBatis -->
        <dependency>
            <groupId>org.mybatis</groupId>
            <artifactId>mybatis-spring</artifactId>
            <version>1.3.2</version>
        </dependency>

        <dependency>
            <groupId>org.mybatis</groupId>
            <artifactId>mybatis</artifactId>
            <version>3.5.2</version>
        </dependency>
        <!--<dependency>
            <groupId>org.apache.commons</groupId>
            <artifactId>commons-dbcp2</artifactId>
            <version>2.7.0</version>
        </dependency>-->
        <!-- Test -->
        <dependency>
            <groupId>junit</groupId>
            <artifactId>junit</artifactId>
            <version>4.12</version>
            <scope>test</scope>
        </dependency>
    </dependencies>
</project>
src/main/resource
user-mapper.xml (매퍼 , mapper namespace는 null 이 될 수 없음)
<?xml version="1.0" encoding="UTF-8"?>
<!DOCTYPE mapper
        PUBLIC "-//mybatis.org//DTD Mapper 3.0//EN"
        "http://mybatis.org/dtd/mybatis-3-mapper.dtd">
<mapper namespace="notEmpty">

</mapper>
src/main/mybatis-config.xml (마이바티스 config)
<?xml version="1.0" encoding="UTF-8"?>
<!DOCTYPE configuration
        PUBLIC "-//mybatis.org//DTD Config 3.0//EN" "http://mybatis.org/dtd/mybatis-3-config.dtd">
    <configuration>

    </configuration>
applicationContext.xml (DB 설정/ sqlSessionFactory / sqlSessionTemplate 설정)
<?xml version="1.0" encoding="UTF-8"?>
<beans xmlns="http://www.springframework.org/schema/beans"
       xmlns:xsi="http://www.w3.org/2001/XMLSchema-instance"
       xsi:schemaLocation="http://www.springframework.org/schema/beans http://www.springframework.org/schema/beans/spring-beans.xsd">
    <!-- MariaDB 설정 -->
    <bean id="dataSource" class="org.springframework.jdbc.datasource.DriverManagerDataSource">
        <property name="driverClassName" value="com.mysql.cj.jdbc.Driver" />
        <property name="url" value="jdbc:mysql://127.0.0.1:3306/todoapp?characterEncoding=UTF-8" />
        <property name="username" value="root" />
        <property name="password" value="1234" />
    </bean>

    <!-- Mapper 설정
        mapper 경로는 value = src/main/resources 폴더의 하위 경로를 작성 -->
    <!-- value는 값을 지정 ref는 이미 지정한 값을 가져오는 것 -->
    <bean id="sqlSessionFactory" class="org.mybatis.spring.SqlSessionFactoryBean">
        <property name="dataSource" ref="dataSource" />
        <property name="configLocation" value="classpath:/config/mybatis/mybatis-config.xml" />
        <property name="mapperLocations" value="classpath*:/config/mybatis/mapper/*-mapper.xml" />
    </bean>

    <bean id="sqlSession" class="org.mybatis.spring.SqlSessionTemplate" destroy-method="clearCache">
        <constructor-arg name="sqlSessionFactory" ref="sqlSessionFactory" />
    </bean>
</beans>'Spring Framework > Spring' 카테고리의 다른 글
| [Web] Cookie (쿠키 생성, 읽기) 방법 (0) | 2021.07.20 |
|---|---|
| [JSON] Java - json 파싱 (0) | 2021.07.13 |
| [03/07] Spring (mysql 연결), Mysql 5.7 CE버전 (0) | 2021.03.07 |
| [ Intellij] 4. Spring MVC + Maven 설정 후 Tomcat 연동 (0) | 2021.02.17 |
| [Intellij] 3. Spring MVC 에 Maven 추가 (0) | 2021.02.17 |
1) web.xml 파일에 <context-param> 의 <param-value>에 내용을 추가함
DataSource DB 연결정보 / Mybatis 설정을 위한 mybatis-mapper.xml 추가
/WEB-INF/config/spring/application-datasource.xml (DB)
/WEB-INF/config/mapper/mybatis-mapper.xml (mybatis)
<?xml version="1.0" encoding="UTF-8"?>
<web-app xmlns="http://xmlns.jcp.org/xml/ns/javaee"
         xmlns:xsi="http://www.w3.org/2001/XMLSchema-instance"
         xsi:schemaLocation="http://xmlns.jcp.org/xml/ns/javaee http://xmlns.jcp.org/xml/ns/javaee/web-app_4_0.xsd"
         version="4.0">
    <context-param>
        <param-name>contextConfigLocation</param-name>
        <param-value>
            /WEB-INF/applicationContext.xml
            /WEB-INF/config/spring/application-datasource.xml <!-- DB 설정 위치 -->
            /WEB-INF/config/mapper/mybatis-mapper.xml <!-- MyBatis Mapper 위치 -->
        </param-value>
    </context-param>
    <listener>
        <listener-class>org.springframework.web.context.ContextLoaderListener</listener-class>
    </listener>
    <servlet>
        <servlet-name>dispatcher</servlet-name>
        <servlet-class>org.springframework.web.servlet.DispatcherServlet</servlet-class>
        <load-on-startup>1</load-on-startup>
    </servlet>
    <servlet-mapping>
        <servlet-name>dispatcher</servlet-name>
        <url-pattern>/</url-pattern>
    </servlet-mapping>
    <welcome-file-list>
        <welcome-file>/WEB-INF/view/Login/main.jsp</welcome-file>
    </welcome-file-list>
</web-app>
2) pom.xml 변화 (마이바티스, mysql 커넥터, inject 애너테이션 사용가능하게 하는 라이브러리 등 추가)
 	<!-- 롬복 -->
        <dependency>
            <groupId>org.projectlombok</groupId>
            <artifactId>lombok</artifactId>
            <version>1.18.18</version>
            <scope>provided</scope>
        </dependency>
        <!-- 마이바티스 라이브러리-->
        <dependency>
            <groupId>org.mybatis</groupId>
            <artifactId>mybatis</artifactId>
            <version>3.2.2</version>
        </dependency>
        <!-- 마이바티스 : 스프링 라이브러리 -->
        <dependency>
            <groupId>org.mybatis</groupId>
            <artifactId>mybatis-spring</artifactId>
            <version>1.2.0</version>
        </dependency>

        <!-- mysql 커넥터-->
        <dependency>
            <groupId>mysql</groupId>
            <artifactId>mysql-connector-java</artifactId>
            <version>8.0.22</version>
        </dependency>

        <!-- 스프링 jdbc -->
        <dependency>
            <groupId>org.springframework</groupId>
            <artifactId>spring-jdbc</artifactId>
            <version>5.2.3.RELEASE</version>
        </dependency>

        <!-- 아파치 dbcp -->
        <dependency>
            <groupId>org.apache.commons</groupId>
            <artifactId>commons-dbcp2</artifactId>
            <version>2.8.0</version>
        </dependency>

        <!-- @inject 사용을 위한 -->
        <dependency>
            <groupId>javax.inject</groupId>
            <artifactId>javax.inject</artifactId>
            <version>1</version>
        </dependency>
3) application-datasource.xml (spring xml을 생성하고 빈만 설정해주면 됨) - Mysql
<?xml version="1.0" encoding="UTF-8"?>
<beans xmlns="http://www.springframework.org/schema/beans"
       xmlns:xsi="http://www.w3.org/2001/XMLSchema-instance"
       xsi:schemaLocation="http://www.springframework.org/schema/beans http://www.springframework.org/schema/beans/spring-beans.xsd">

    <bean id="dataSource" class="org.apache.commons.dbcp2.BasicDataSource" destroy-method="close">
        <property name="driverClassName" value="com.mysql.cj.jdbc.Driver"/>
        <property name="url" value="jdbc:mysql://localhost:3306/todoApp?characterEncoding=UTF-8"/>
        <property name="username" value="root"/>
        <property name="password" value="1234"/> </bean>
</beans>
4) mybatis-mapper.xml (spring xml 을 생성하고, 빈 설정)
<?xml version="1.0" encoding="UTF-8"?>
<beans xmlns="http://www.springframework.org/schema/beans"
       xmlns:xsi="http://www.w3.org/2001/XMLSchema-instance" xmlns:jdbc="http://www.springframework.org/schema/jdbc"
       xsi:schemaLocation="http://www.springframework.org/schema/beans http://www.springframework.org/schema/beans/spring-beans.xsd http://www.springframework.org/schema/jdbc http://www.springframework.org/schema/jdbc/spring-jdbc.xsd">

    <bean id="sqlSession" class="org.mybatis.spring.SqlSessionFactoryBean">
        <property name="dataSource" ref="dataSource" />
        <!-- <property name="mapperLocations" value="classpath:/mapper/sql/*_SQL.xml" /> -->
    </bean>
    <bean id="sqlSessionTemplate" class="org.mybatis.spring.SqlSessionTemplate">
        <constructor-arg index="0" ref="sqlSession"/>
    </bean>
</beans>
sqlSession 이름으로 빈을 생성하고, 클래스는 SqlSessionFactoryBean 객체를 사용
프로퍼티이름은 dataSource 이며, dataSource Bean을 참조한다.
sqlSessionTemplate 이름으로 빈 생성, 클래스는 SqlSessionTemplate을 사용한다.
5) 아직 Mybatis를 사용하는 설정을 적용하지 않은 상태이며, DB 연결만 테스트를 해본 코드임
package com.todoapp.Login.controller;

import org.springframework.beans.factory.annotation.Autowired;
import org.springframework.web.bind.annotation.RequestMapping;
import org.springframework.web.bind.annotation.RestController;

import javax.inject.Inject;
import javax.sql.DataSource;
import java.sql.Connection;

@RestController
public class Login {

    @Inject
    private DataSource dataSource;

    @RequestMapping("/login")
    public String login()
    {
        try
        {
            Connection conn = (Connection) dataSource.getConnection();
            System.out.println("성공 : " + conn);
        }
        catch(Exception e)
        {
            System.out.println("실패 !");
            e.printStackTrace();
        }
        return "";
    }
}
6) 성공 메세지가 나옴

이걸로 몇일을 헤메다가 결국 이까지 해결하긴 했지만, 각각이 무엇인지 정확하게 이해한 것이 아니라서, Mybatis SQL 매핑하는 것까지 해보고 동작하는 과정을 자세하게 찾아보아야겠음.
설정하는 것이 이번에 총 세번째인데 할 때마다 다른 에러로 문제를 겪는 기분
'Spring Framework > Spring' 카테고리의 다른 글
| [JSON] Java - json 파싱 (0) | 2021.07.13 |
|---|---|
| [spring] mybatis 설정 (0) | 2021.03.30 |
| [ Intellij] 4. Spring MVC + Maven 설정 후 Tomcat 연동 (0) | 2021.02.17 |
| [Intellij] 3. Spring MVC 에 Maven 추가 (0) | 2021.02.17 |
| [Intellij] 2. Spring MVC 프로젝트 설정 (0) | 2021.02.17 |
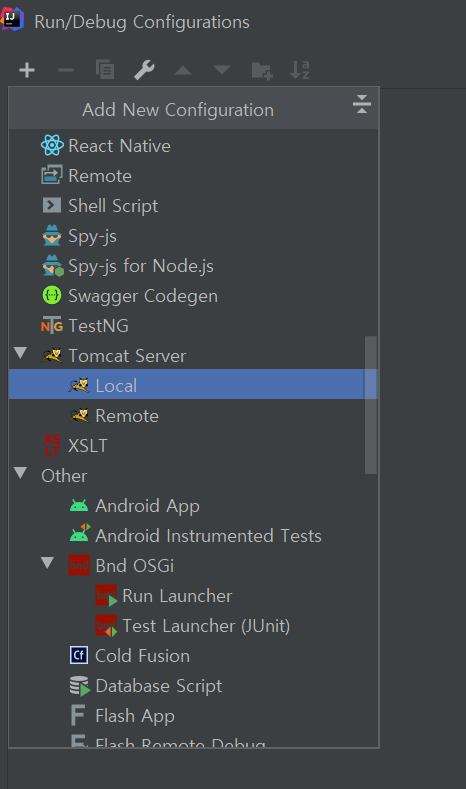
1. [Add Configuration] - 클릭

2. [+] 누른 후 - Tomcat Server - Local 선택
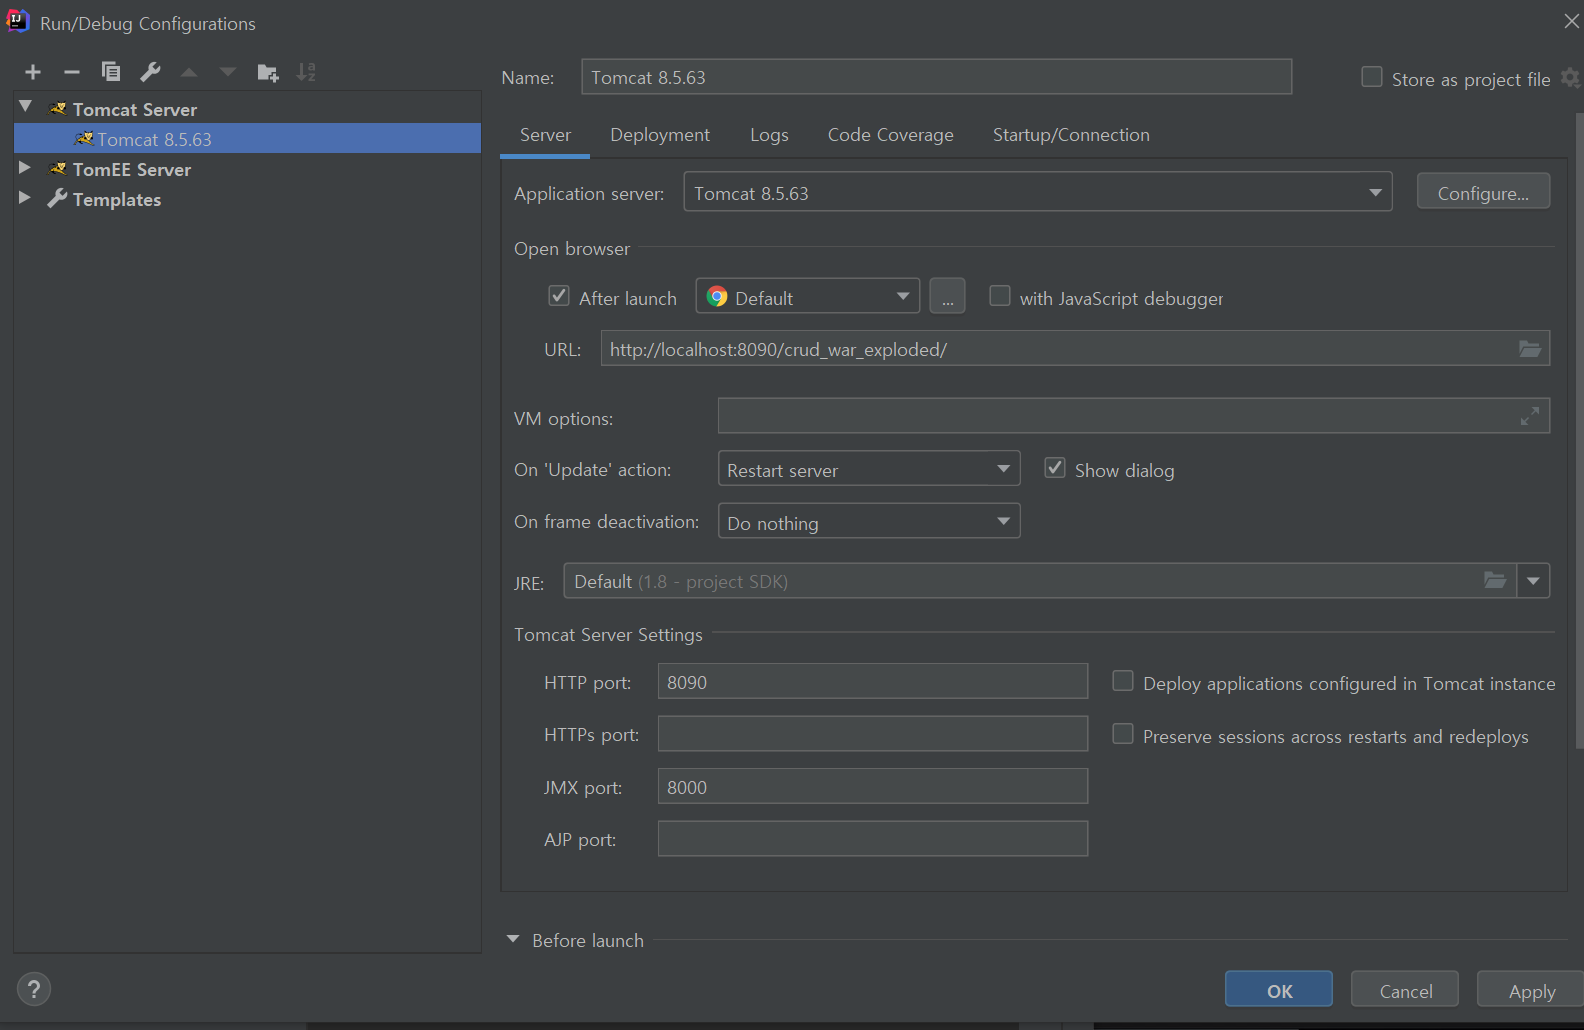
3. Port 지정 - [8090]
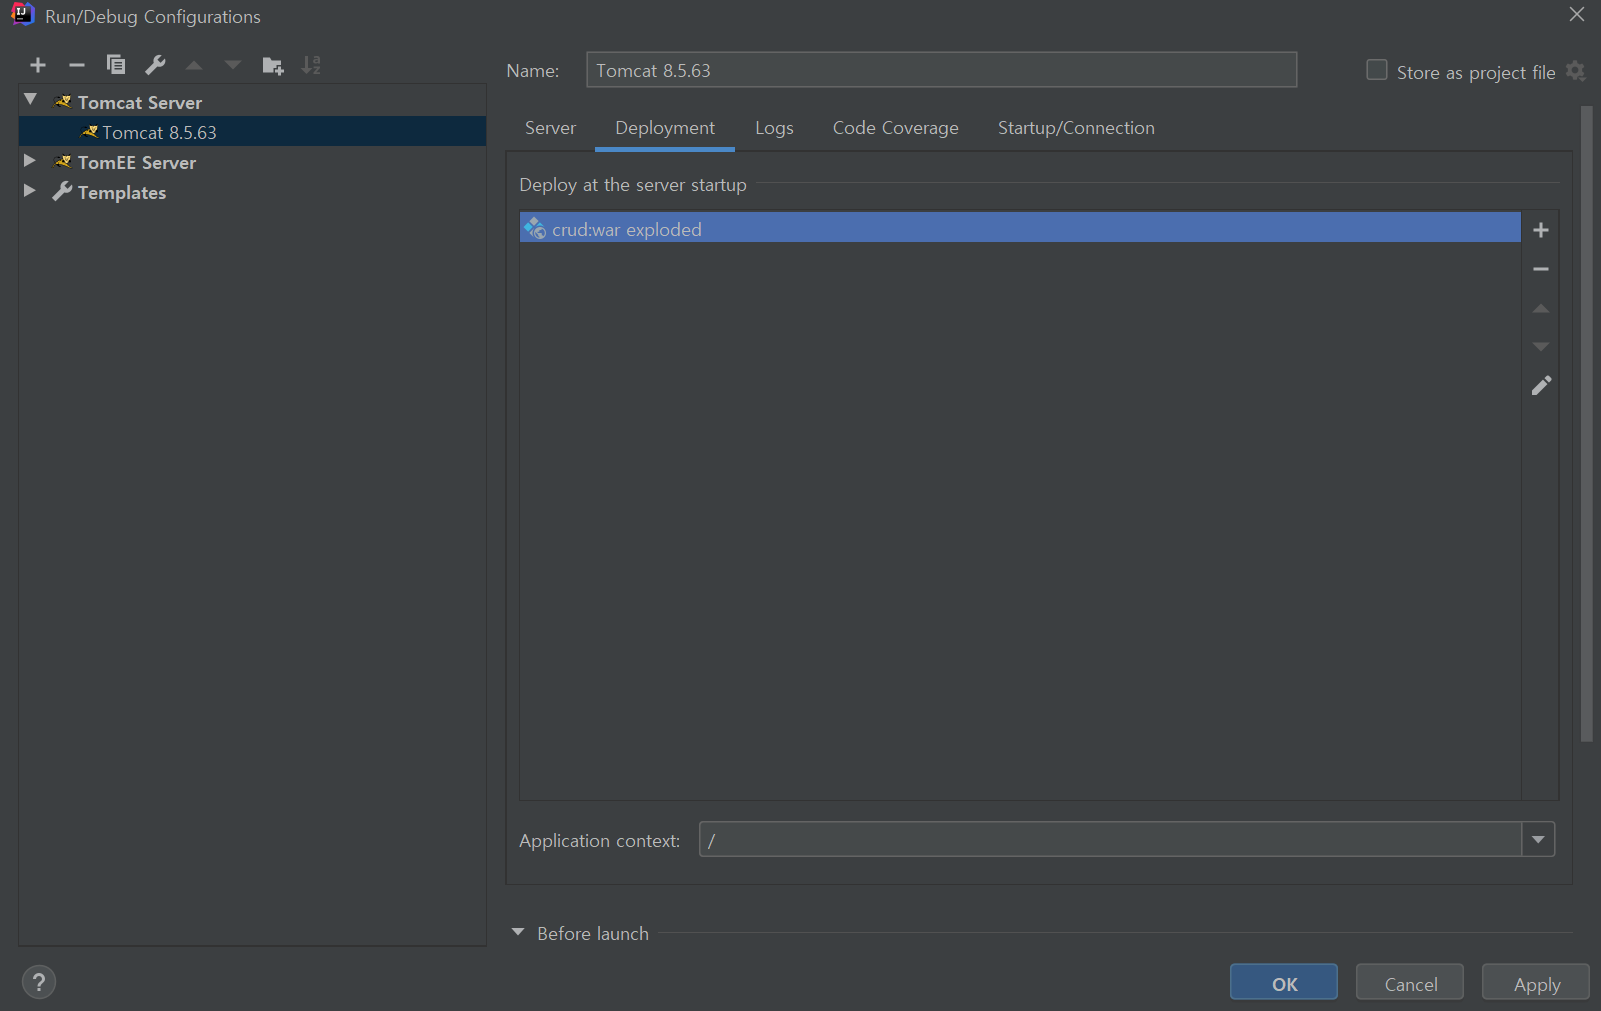
4. Deployment - Application context 설정
이 설정은 URL : http://localhost:8090/{여기 주소를 말한다}
5. 연필 모양 눌러서 편집

6. Web Application: Archive

7. 실행 - 초록색 화살표 버튼

8. 결과

'Spring Framework > Spring' 카테고리의 다른 글
| [spring] mybatis 설정 (0) | 2021.03.30 |
|---|---|
| [03/07] Spring (mysql 연결), Mysql 5.7 CE버전 (0) | 2021.03.07 |
| [Intellij] 3. Spring MVC 에 Maven 추가 (0) | 2021.02.17 |
| [Intellij] 2. Spring MVC 프로젝트 설정 (0) | 2021.02.17 |
| [Spring] json 형식 주고 받기 (0) | 2021.01.09 |
Maven Repogitory 은 "라이브러리" 저장소 입니다.
Maven 은 프로젝트에 필요한 라이브러리를 관리하기 편하게 프로젝트 구조를 잡아줍니다
1. 앞서 생성된 프로젝트를 [우클릭] - [Add Framework Support]

2. [Maven] 체크 -> [OK]

3. 폴더 및 파일 몇 개 추가가 되었습니다.
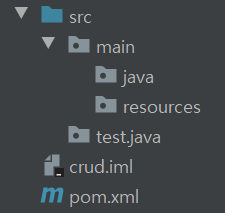
java 폴더에는 Java 파일을 생성하여 코딩하고,
resources 는 그 외의 파일들을 넣어서 관리합니다.
pom.xml 은 maven 저장소에서 라이브러리를 받아오기 위해 작성하는 XML 형식의 문서입니다.
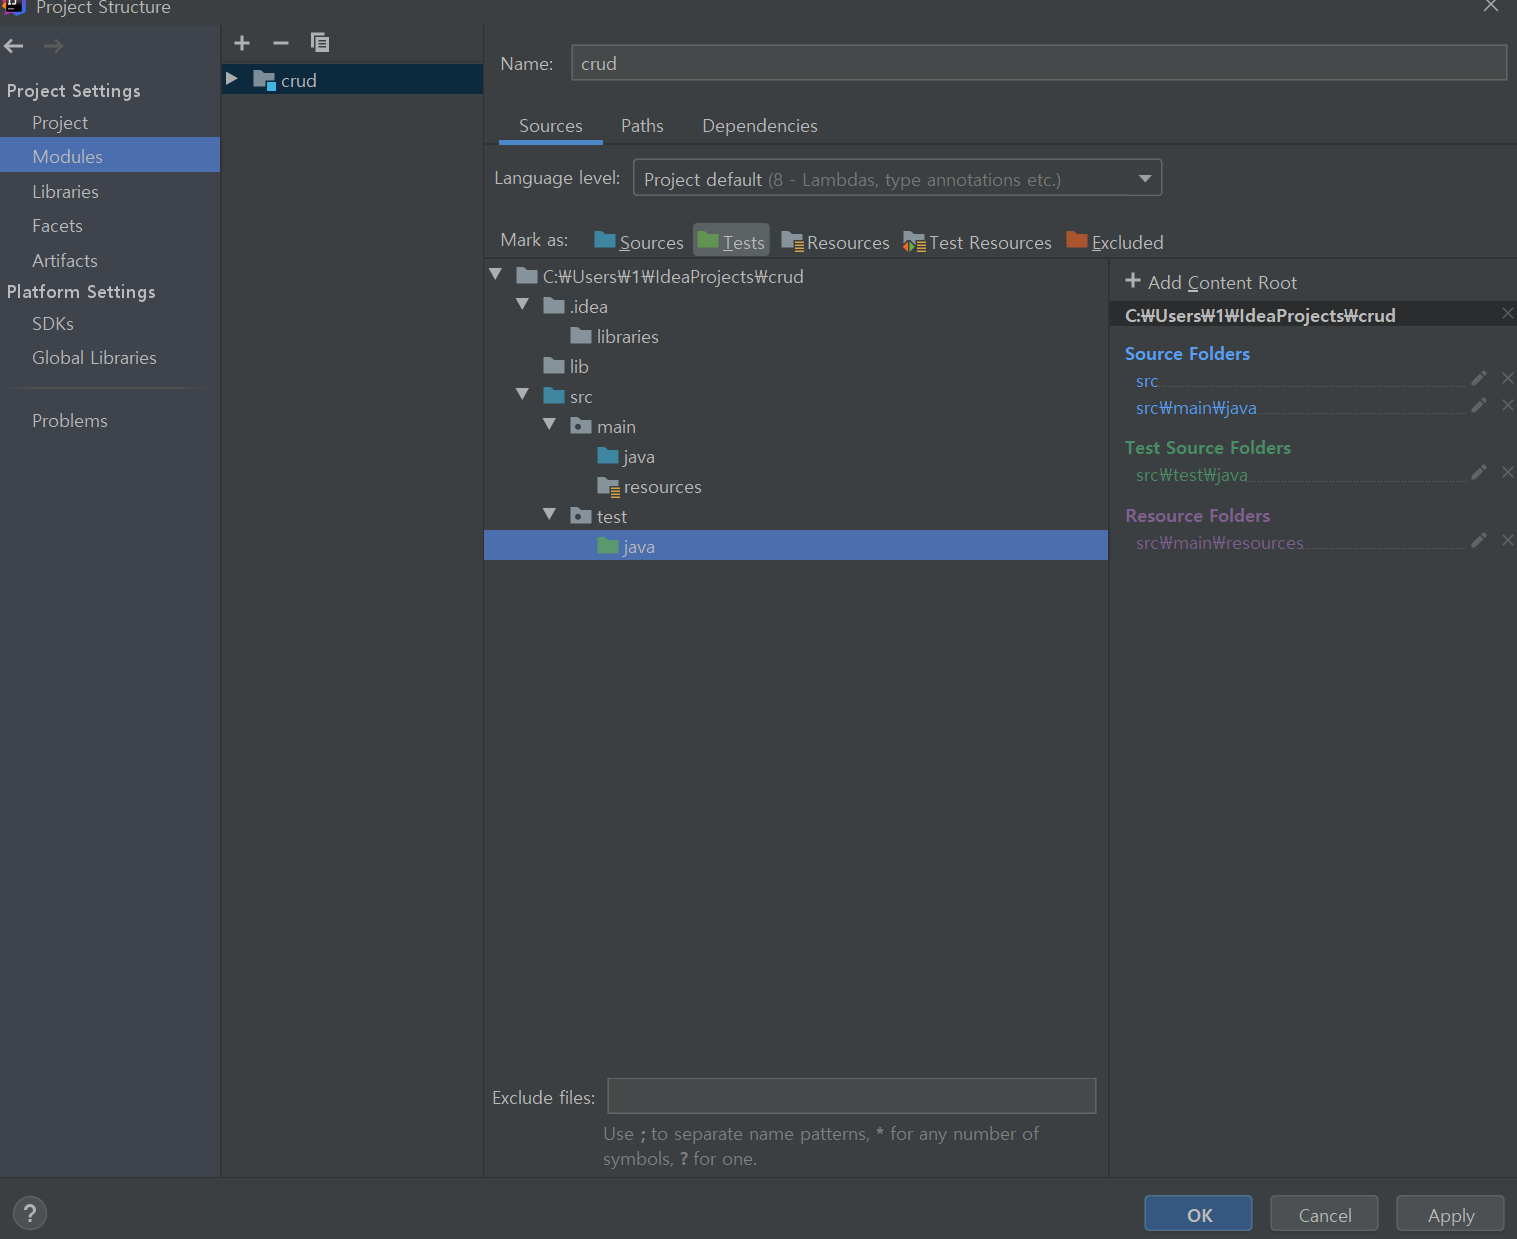
4. 프로젝트 구조 설정 (project Structure) - [FILE] - [Project Structure]

[Mark as] : 폴더 모양을 눌러서 src 폴더를 아래 처럼 설정해줍니다.
'Spring Framework > Spring' 카테고리의 다른 글
| [03/07] Spring (mysql 연결), Mysql 5.7 CE버전 (0) | 2021.03.07 |
|---|---|
| [ Intellij] 4. Spring MVC + Maven 설정 후 Tomcat 연동 (0) | 2021.02.17 |
| [Intellij] 2. Spring MVC 프로젝트 설정 (0) | 2021.02.17 |
| [Spring] json 형식 주고 받기 (0) | 2021.01.09 |
| [Spring] 컨트롤러에서 파라미터를 받는 방법 (0) | 2021.01.07 |
1. [File] - [New] - [Project]

2. [Spring] - [v] Spring -> [Next] (그림에 빠졌으나 Spring MVC 선택할 것)
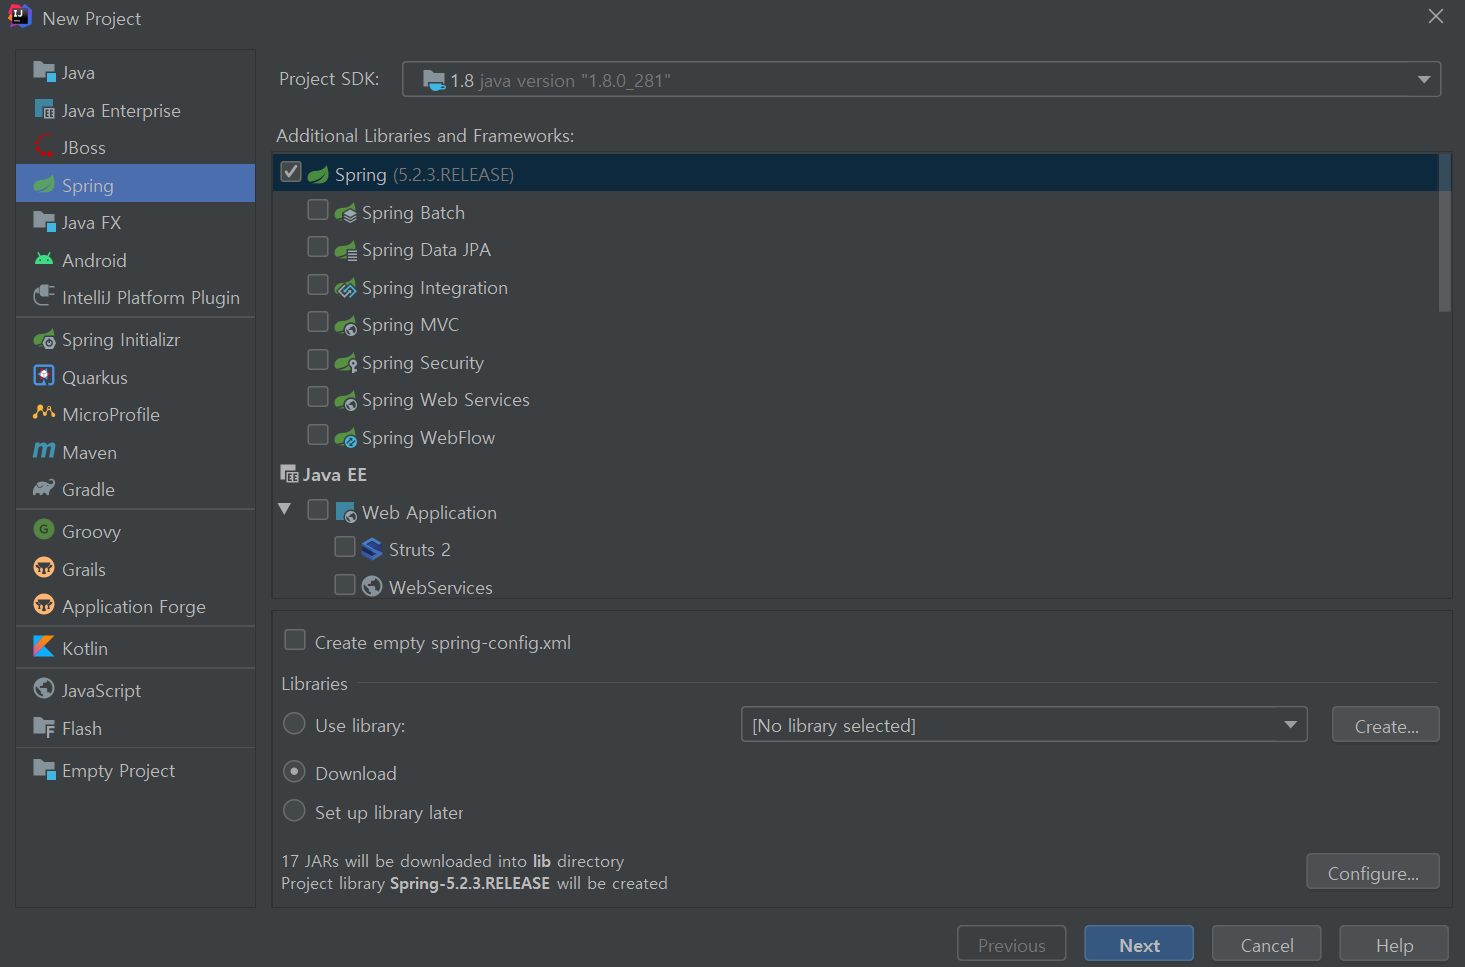
3. Project name : 이름 정하기 -> [FINISH]

4. 프로젝트 생성 완료

'Spring Framework > Spring' 카테고리의 다른 글
| [ Intellij] 4. Spring MVC + Maven 설정 후 Tomcat 연동 (0) | 2021.02.17 |
|---|---|
| [Intellij] 3. Spring MVC 에 Maven 추가 (0) | 2021.02.17 |
| [Spring] json 형식 주고 받기 (0) | 2021.01.09 |
| [Spring] 컨트롤러에서 파라미터를 받는 방법 (0) | 2021.01.07 |
| [spring] 2. 한글 처리 filter (web.xml) (0) | 2020.06.09 |
pom.xml
<!-- json bind -->
<dependency>
	<groupId>com.fasterxml.jackson.core</groupId>
    <artifactId>jackson-databind</artifactId>
    <version>2.5.1</version>
</dependency>
servlet-context.xml
<beans:bean class="org.springframework.http.converter.json.MappingJackson2HttpMessageConverter"
@ResponseBody
@RequestMapping(생략...)
public Map returnJson(@RequestBody HashMap<String, String> map)
{
	//@RequestBody로 JSON형식을 받을 수 있고
    for(Entry<String, String> entry : map.entrySet())
    {
    	System.out.println(String.format("key: %s, val: %s", entry.getKey(), entry.getValue()));
    }
    //결과를 여러개 담으려면?
    List<Map<String, String>> allrst = new ArrayList<Map<String,String>>();

    //첫번째 결과 생성
    Map<String, String> eachrst = null;
    eachrst = new HashMap<String, String>();
    eachrst.put("name", "홍길동");
    eachrst.put("age", "10");

    //첫번째 결과를 리스트에 저장
    allrst.add(eachrst);

    //두번째 결과 생성
    eachrst = new HashMap<String, String>();
    eachrst.put("name", "김길동");
    eachrst.put("age", "11");

    //두번쨰 결과 리스트에 저장
    allrst.add(eachrst);

	//@ResponseBody로 JSON형식을 리턴해줄 수 있다.
    Map<String, Object> result = new HashMap<String, Object>();
    result.put("result", allrst);

    return result;
}
javascript 에서 비동기통신으로 요청 예
function test()
{
	fetch(url, {
    	method:"POST",
        headers:{
			"Content-Type" : "application/json;charset=utf-8"
        },
        body: JSON.stringify({
        	전달 파라미터1 : 값,
            전달 파라미터2 : 값,
        })
    })
    .then(resp => resp.json())
    .then(function(res){
    	//요청한 응답을 res 파라미터로 리턴받음
    	var rst = res.result; //res의 첫 노드 이름이 result. 컨트롤러에서 arraylist 를 저장한 키

        //하나씩 꺼내는 방법
        rst.forEach(function(items){
			console.log("이름 : " + items.name + "\n나이 : " + items.age);

        })
    })
    .catch(err => console.log(err));
}
'Spring Framework > Spring' 카테고리의 다른 글
| [Intellij] 3. Spring MVC 에 Maven 추가 (0) | 2021.02.17 |
|---|---|
| [Intellij] 2. Spring MVC 프로젝트 설정 (0) | 2021.02.17 |
| [Spring] 컨트롤러에서 파라미터를 받는 방법 (0) | 2021.01.07 |
| [spring] 2. 한글 처리 filter (web.xml) (0) | 2020.06.09 |
| [Spring] 의존 주입 - 작성중 (0) | 2020.04.21 |
1. @RequestParam("파라미터") String id
public String example (@RequestParam("id") String id)
요청 : url?id=홍길동
System.out.println(id); //홍길동
2. @RequestBody HashMap<String, String> map 으로받는 방법
public String example(@RequestBody HashMap<String, String> map)
요청 : url?id=홍길동&age=1&today=20210107
for(Entry<String, String> entry : map.entrySet())
{
	System.out.println(String.format("key: %s, val: %s", entry.getKey(), entry.getValue()));
}
key: id val: 홍길동
key: age val: 1
key: today val: 20210107
'Spring Framework > Spring' 카테고리의 다른 글
| [Intellij] 2. Spring MVC 프로젝트 설정 (0) | 2021.02.17 |
|---|---|
| [Spring] json 형식 주고 받기 (0) | 2021.01.09 |
| [spring] 2. 한글 처리 filter (web.xml) (0) | 2020.06.09 |
| [Spring] 의존 주입 - 작성중 (0) | 2020.04.21 |
| [Spring] 클래스 컨테이너 (0) | 2020.04.20 |
@Controller (view 를 반환)
Controller Class 에 @Controller 를 작성합니다.
해당 어노테이션의 의미는 "이 class 는 Controller 이며" 해당 클래스가 bean으로 등록됩니다.
해당 class 가 Controller로 사용됨을 Spring Framework에 알립니다.
1) String 을 반환하는 메서드에서 return "main"; 을 하면, views/main.jsp 파일을 찾음
2) ModelAndView 를 반환하는 메서드에서 return mav; 를 하면, ModelAndView 객체를 반환하며, setViewName으로 view 화면과, addObject() 로 객체를 View 단에 넘겨줄 수 있음.
@ResponseBody
json 형태로 응답해줄 수 있으며, view 를 반환하지 않음
'Spring Framework > Annotation' 카테고리의 다른 글
| Spring @Bean - 스프링 빈 (0) | 2021.07.08 |
|---|
web.xml 에 적용
	<filter>
		<filter-name>encodingFilter</filter-name>
		<filter-class>
			org.springframework.web.filter.CharacterEncodingFilter
		</filter-class>
		<init-param>
			<param-name>encoding</param-name>
			<param-value>UTF-8</param-value>
		</init-param>
		<init-param>
			<param-name>forceEncoding</param-name>
			<param-value>true</param-value>
		</init-param>
	</filter>

	<filter-mapping>
		<filter-name>encodingFilter</filter-name>
		<url-pattern>/*</url-pattern>
</filter-mapping>'Spring Framework > Spring' 카테고리의 다른 글
| [Spring] json 형식 주고 받기 (0) | 2021.01.09 |
|---|---|
| [Spring] 컨트롤러에서 파라미터를 받는 방법 (0) | 2021.01.07 |
| [Spring] 의존 주입 - 작성중 (0) | 2020.04.21 |
| [Spring] 클래스 컨테이너 (0) | 2020.04.20 |
| [spring] - pom.xml 의 dependency (0) | 2020.04.20 |
내용 출처
온라인 클래스 오픈 플랫폼, 인프런
인프런은 누구에게나 성장의 기회를 균등하게 부여하기 위해 만들어진 온라인 학습, 지식 공유 중개 플랫폼 입니다. 개발, 프로그래밍, IT, 영상 편집, 그로스 해킹, 블록체인, 마케팅, 디자인, 금융, 투자 등 온라인 수업을 듣고 낡은 지식이 아닌 현업 전문가가 가르치는 현업에서 쓰이는 실전 강의를 시간적, 경제적 제약 없이 어디서든 학습하세요. 세상에 알리고 싶은 지식을 온라인 강의로 제작하고 20만명 이상의 인프런 회원에게 공개해보세요. 지식 공유를
www.inflearn.com
의존 주입 (Dependency Injection)
프로그래밍에서 객체를 만들어서 외부에서 따로 주입하는 방식
제일 안좋은 프로그램 : 변경이 쉽지 않은 프로그램
1. 배터리 일체형 - 장난감 자동차 (배터리가 떨어지면 장난감을 새로 구입해야함) 의존성이 큼
생성자에서 객체에 주입
public class ElectronicCarToy {
	private Battery battery;

    public ElectroniCarToy() {
    	battery = new NormalBattery();
    }
}
2. 배터리 분리형
setter 메서드에서 객체에 주입
public class ElectronicRobotToy {
	private Battery battery;

    public ElectronicRobotToy() {

    }

    public void setBattery(Battery battery) {
    	this.battery = battery;
    }
}
3. 배터리 분리형 - 공장에서 미리 배터리를 넣어놓고, 원할 때 교체
public class ElectronicRobotToy {
	private Battery battery;

    public ElectronicRobotToy() {
    	this.battery = battery;
    }

    public void setBattery(Battery battery) {
    	this.battery = battery;
    }
}
스프링에서의 의존주입
스프링 컨테이너에서 주입하고 의존하는 관계
1. 스프링 DI 설정
ㄱ) 스프링 설정파일 (XML) 파일
ㄴ) GenericXmlApplicationContext 로 파일을 읽음
ㄷ) 스프링 컨테이너에서 큰 객체에 작은 객체가 들어있는 것을 보고 (주입이 되어있다고 함)
ㄹ) 사용할 때는 getBean라고 사용하고, 객체를 생성할 때는 Bean사용
'Spring Framework > Spring' 카테고리의 다른 글
| [Spring] 컨트롤러에서 파라미터를 받는 방법 (0) | 2021.01.07 |
|---|---|
| [spring] 2. 한글 처리 filter (web.xml) (0) | 2020.06.09 |
| [Spring] 클래스 컨테이너 (0) | 2020.04.20 |
| [spring] - pom.xml 의 dependency (0) | 2020.04.20 |
| [spring] - 스프링 프로젝트 생성 (0) | 2020.04.19 |
기존의 자바 프로그램 작성시에 다른 클래스의 메서드를 사용할 때에
객체를 생성하는 것과 스프링에서 객체를 생성하는 방법의 차이.
기존방식
A.java
public class A
{
	public void printA()
    {
    	System.out.println("클래스 A");
    }
}
MainClass.java
public class MainClass
{
	public static void main(String[] args)
    {
    	A a = new A();
        a.printA();
    }
}
스프링에서 사용하는 방식
- 클래스 컨테이너에 객체를 생성( xml 파일에 작성)
- 클래스에서 클래스 컨테이너 경로를 잡아줌
- 클래스 컨테이너에서 객체를 얻어옴
applicationContext.xml
<?xml version="1.0" encoding="UTF-8"?>

<beans xmlns="http://www.springframework.org/schema/beans"
	xmlns:xsi="http://www.w3.org/2001/XMLSchema-instance"
	xsi:schemaLocation="http://www.springframework.org/schema/beans
		http://www.springframework.org/schema/beans/spring-beans.xsd">

	<!-- 클래스 모음 / 객체 생성 -->
	<bean id="a" class="test.A" />

</beans>
A.java
public class A
{
	public void printA()
    {
    	System.out.println("클래스 A");
    }
}
MainClass.java
import org.springframework.context.support.GenericXmlApplicationContext;

public class MainClass
{
	public static void main(String[] args)
    {
    	//spring container에 접근 = applicationContext.xml(클래스 컨테이너)
		//1. 클래스를 선언해놓은 컨테이너에 접근하기위해 컨테이너 주소를 적어줌
		GenericXmlApplicationContext ctx = new GenericXmlApplicationContext("classpath:applicationContext.xml");
		//2. 객체를 가져와서 사용
		A a = ctx.getBean("a", A.class);
		a.printA();
    }
}'Spring Framework > Spring' 카테고리의 다른 글
| [Spring] 컨트롤러에서 파라미터를 받는 방법 (0) | 2021.01.07 |
|---|---|
| [spring] 2. 한글 처리 filter (web.xml) (0) | 2020.06.09 |
| [Spring] 의존 주입 - 작성중 (0) | 2020.04.21 |
| [spring] - pom.xml 의 dependency (0) | 2020.04.20 |
| [spring] - 스프링 프로젝트 생성 (0) | 2020.04.19 |
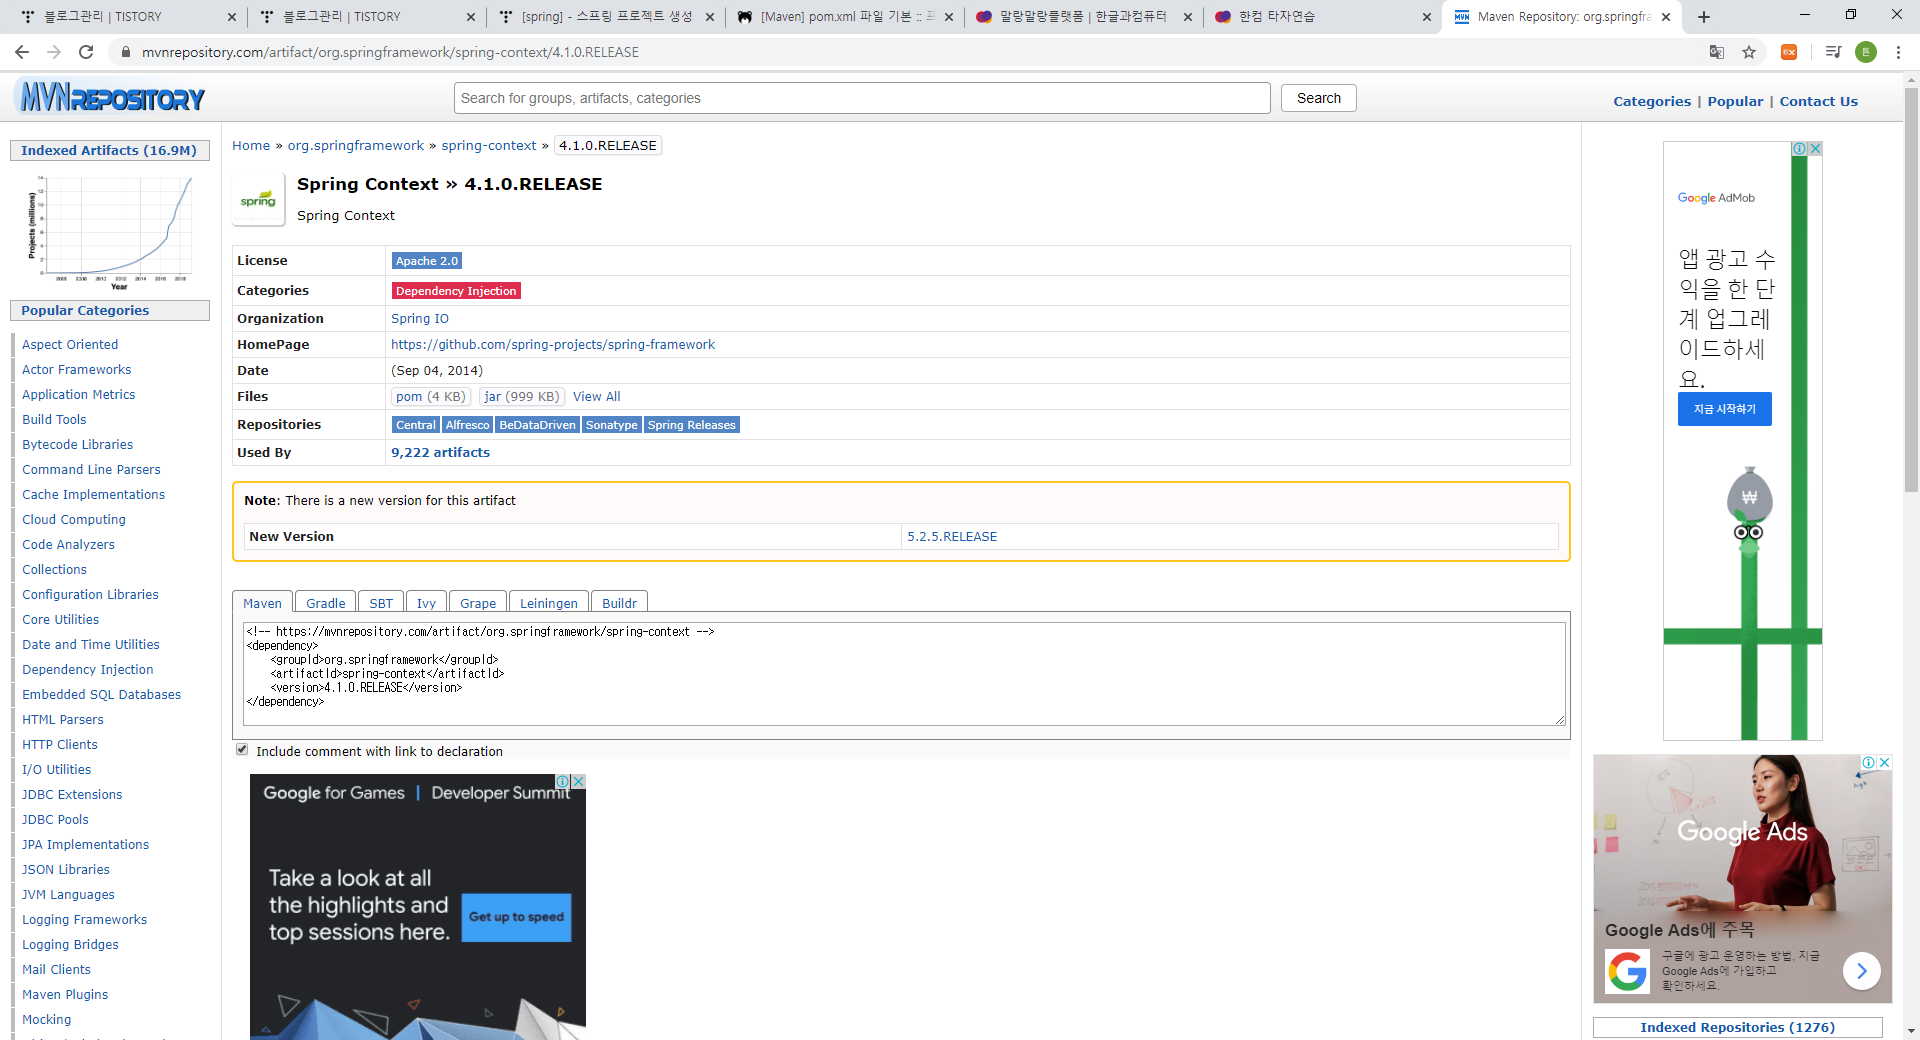
pom.xml 에 dependency에 작성해주는 것을 그대로 따라 적는데
왜 project의 groupId 랑 artifactId랑 다른가 해서 찾아보니
외부에 있는
groupId = 제작자
artifactId = 프로젝트 이름
으로 부터 제공 받는다고 생각하니 의문이 풀렸다.
org.springframework를 주소에 쳐보니 이해가 됬다.
Maven 프로젝트를 선택하면 그것에 맞는 pom.xml 에 넣을 수 있는 형태로 만들어 준다.
'Spring Framework > Spring' 카테고리의 다른 글
| [Spring] 컨트롤러에서 파라미터를 받는 방법 (0) | 2021.01.07 |
|---|---|
| [spring] 2. 한글 처리 filter (web.xml) (0) | 2020.06.09 |
| [Spring] 의존 주입 - 작성중 (0) | 2020.04.21 |
| [Spring] 클래스 컨테이너 (0) | 2020.04.20 |
| [spring] - 스프링 프로젝트 생성 (0) | 2020.04.19 |
