
- [JSP] ajax 통신 : json / jsonObject/jsonArray 2020.01.19
- [JSP] [naver검색 API사용해보기] [java] jsonString을 jsonObject로 파싱 2020.01.19
- [JSP] MySQL 설치 2019.12.01
- [JSP] 예시 ] SQL_QUERY , 내장객체 세션, 절대 경로 2019.11.19
- [JSP] 액션태그 2019.11.05
- [JSP] XML/JSP 페이지에서 에러 페이지 연결 시키기 2019.11.05
- [JSP]포워딩 2019.11.04
- [JSP] session scope 와 application scope 차이 2019.11.04
- [JSP] 영역 객체와 속성 2019.11.02
- [JSP] config - 객체 2019.11.02
- [JSP] out - 객체 2019.11.02
- [JSP] application - 객체 2019.11.02
- [JSP] Session 객체 2019.11.02
- [JSP] pageContext 객체 2019.11.02
- [JSP] Session 객체 - 메소드 2019.11.02
- [JSP] 내장객체 - http헤더 2019.11.02
- [JSP] 내장 객체 - request 2019.11.02
- [JSP] 서블릿 페이지-> JSP페이지/ JSP 스크립트 요소 2019.10.30
- [JSP]서블릿 (httpservlet) 2019.10.30
- [JSP]SERVER.XML 2019.10.16
DB에서 책 리스트를 조회해서 뿌려주는 부분
흐름
1. 자바스크립트에서 ajax를 실행
2. 받아오는 데이터 형식 json
3. DB에서 조회해온 데이터를 Controller에서 다시 json형식으로 만들어주어야함.
4. 받아온 데이터를 key값으로 접근해서 사용
function booklist()
{
	var url = "bookselect.text";
	var form_data = {
			/**/
	}

	$.ajax({
		type : "post",
		url : url,
		data : form_data,
		contentType: "application/x-www-form-urlencoded; charset=UTF-8",
		dataType : "json",
		success : function(getData) {
			console.log(getData);
			var string ="";

			for (var i = 0; i < getData.list.length; i++) {
				var comments =
					"<div class='booklist'>"
					+ 	"<div class='bookimg'>"
					+		"<img src='./images/book1.jpg'>"
					+	"</div>"
					+	"<div class='content_wrap'>"
					+		"<a href='#'>"
					+			"<p class='booktitle'>" + getData.list[i].book_title + "</p>"
					+			"<p class='bookcontent'>" + getData.list[i].book_price +"<br>" + getData.list[i].book_page + "<br>" + getData.list[i].book_publisher + "<br>"+ getData.list[i].book_uploaddate
					+			"</p>"
					+		"</a>"
					+	"</div>";

				string = string + comments;
			}
			$(".wrapboard").html(string);
		},
		error : function(request,status,error){
			alert("code = "+ request.status + " message = " + request.responseText + " error = " + error);
			console.log(error);
		}
	});
DAO
가장 먼저 DAO에서 처리 결과를 rs.next()로 커서를 옴겨가며 ArrayList 에 담아준다.
그러면 list.add()를 통해 담기고 list.get(i)를 통해 가져올 수 있다.
   @Override
    public ArrayList<TextbookBean> selectBookList(TextbookBean tBean) {
    	ArrayList<TextbookBean> list = new ArrayList<TextbookBean>();
    	try {
    		con = getConnection();
    		sql = "select * from book";
    		pstmt = con.prepareStatement(sql);
    		rs = pstmt.executeQuery();
    		System.out.println("??????????????????????");
    		while(rs.next())
    		{
    			System.out.println("??????????????????????");
    			TextbookBean textBean = new TextbookBean();

    			textBean.setBook_title(rs.getString(1));
    			textBean.setBook_content(rs.getString(2));
    			textBean.setBook_publisher(rs.getString(3));
    			textBean.setBook_price(rs.getInt(4));
    			textBean.setBook_no(rs.getInt(5));
    			textBean.setBook_page(rs.getInt(6));
    			textBean.setBook_filename(rs.getString(7));
     			textBean.setBook_uploaddate(rs.getDate(8));

     			System.out.println(rs.getString(1));

     			list.add(textBean);
    		}
    	}catch(Exception e) {

    	}finally {
			closeConnection();
		}
    	for(int i = 0 ; i< list.size(); i++)
    	{
    		System.out.println("dao 책이름 : " + list.get(i).getBook_title());
    	}
    	return list;
    }
}
Controller.java
Controller단에서는 Dao에서 돌려주는 return 값 즉 , list.add()로 담긴 데이터를 꺼내와야한다.
꺼내오는 방법은 list.get(i)가 title/content/publisher/price/no/page/filename을 담고 있기 때문에 .을 찍으면
각각의 해당 객체의 데이터에 접근이 가능하다.
하나의 책 정보만 필요하다면 바로 JSONObject를 통해서 jsonObject 객체.put() 메서드를 사용해서 하나하나씩 담아주면 ajax단에서 getData.book_title 이런식으로 접근할 수 있는 데이터가 만들어진다.
하지만 여러개의 객체를 담아야하기 때문에 JSONArray를 사용해서 담아줘야한다.
JSONArray arr[0] index에 jsondata.put() title/content/publisher/price/no/page/filename
JSONArray arr[1] index에 jsondata.put() title/content/publisher/price/no/page/filename
JSONArray arr[2] index에 jsondata.put() title/content/publisher/price/no/page/filename ...
JSONArray 객체에 JSONObject 객체를 담는 것.
JSONObject를 생성하는것은 객체.put으로 다담으면 JSONArray객체 arr[0] ... arr[n] 에 하나하나씩 arr.add()로 담아준다
tBean = getTextbookBeanProperty(request, response);
				ArrayList<TextbookBean> list = tServ.selectBookList(tBean);

				//jsondata로 파싱
				JSONObject jsondata = new JSONObject();
				Date date = null;
				//jsonString
				String jsonString = null;
				JSONArray arr = new JSONArray();
				//ArrayList에서 값을 꺼내옴
				for(int i=0; i<list.size(); i++) {
					System.out.println("-----------------------");
					jsondata = new JSONObject();
					jsondata.put("book_title", list.get(i).getBook_title());
					jsondata.put("book_content", list.get(i).getBook_content());
					jsondata.put("book_publisher", list.get(i).getBook_publisher());
					jsondata.put("book_price", list.get(i).getBook_price());
					jsondata.put("book_no", list.get(i).getBook_no());
					jsondata.put("book_page", list.get(i).getBook_page());
					jsondata.put("book_filename", list.get(i).getBook_filename());

					date = list.get(i).getBook_uploaddate();
					jsondata.put("book_uploaddate", date.toString());

					arr.add(jsondata);
				}
				JSONObject booklist = new JSONObject();
				booklist.put("list", arr);

				jsonString = booklist.toJSONString();
				System.out.println(jsonString);

				PrintWriter out = response.getWriter();
out.print(jsonString);'JSP' 카테고리의 다른 글
| [JSP] [naver검색 API사용해보기] [java] jsonString을 jsonObject로 파싱 (0) | 2020.01.19 |
|---|---|
| [JSP] MySQL 설치 (0) | 2019.12.01 |
| [JSP] 예시 ] SQL_QUERY , 내장객체 세션, 절대 경로 (0) | 2019.11.19 |
| [JSP] 액션태그 (0) | 2019.11.05 |
| [JSP] XML/JSP 페이지에서 에러 페이지 연결 시키기 (0) | 2019.11.05 |
Controller.java
NaverSearchAPI search = new NaverSearchAPI();
String word = request.getParameter("search");
String result = search.Search(word);
System.out.println(result);

JSONParser paser = new JSONParser();
Object obj = paser.parse(result);
JSONObject jsonObj = (JSONObject) obj;

request.setAttribute("result", jsonObj);
result.jsp
<c:set var="result" value="${requestScope.result}"></c:set>
	<form action="search.text">
		검색<input type="text" name="search">
		<input type="submit" value="검색">
	</form>
	<h1>결과</h1>
	<h1>${result.items[0].title}"></h1>
NaverSearchAPI.java
package textbook.search;

import java.io.BufferedReader;
import java.io.InputStreamReader;
import java.net.HttpURLConnection;
import java.net.URL;
import java.net.URLEncoder;

public class NaverSearchAPI {

    public String Search(String word) {
        String clientId = "";//애플리케이션 클라이언트 아이디값";
        String clientSecret = "";//애플리케이션 클라이언트 시크릿값";
        StringBuffer response = null;
        try {
            String text = URLEncoder.encode(word, "UTF-8");
            String apiURL = "https://openapi.naver.com/v1/search/book.json?query="+ text; // json 결과
            //String apiURL = "https://openapi.naver.com/v1/search/blog.xml?query="+ text; // xml 결과
            URL url = new URL(apiURL);
            HttpURLConnection con = (HttpURLConnection)url.openConnection();
            con.setRequestMethod("GET");
            con.setRequestProperty("X-Naver-Client-Id", clientId);
            con.setRequestProperty("X-Naver-Client-Secret", clientSecret);
            int responseCode = con.getResponseCode();
            BufferedReader br;
            if(responseCode==200) { // 정상 호출
                br = new BufferedReader(new InputStreamReader(con.getInputStream()));
            } else {  // 에러 발생
                br = new BufferedReader(new InputStreamReader(con.getErrorStream()));
            }
            String inputLine;
            response = new StringBuffer();
            while ((inputLine = br.readLine()) != null) {
                response.append(inputLine);
            }
            br.close();
            System.out.println(response.toString());

        } catch (Exception e) {
            System.out.println(e);
        }
        return response.toString();
    }
}
naver api 사용할 때 json으로 데이터 들고 오는데 그 json 데이터를 jsonString으로 가져와서
값에 접근하기 위해서는 jsonObject로 jsonString을 파싱해주어야한다.
'JSP' 카테고리의 다른 글
| [JSP] ajax 통신 : json / jsonObject/jsonArray (0) | 2020.01.19 |
|---|---|
| [JSP] MySQL 설치 (0) | 2019.12.01 |
| [JSP] 예시 ] SQL_QUERY , 내장객체 세션, 절대 경로 (0) | 2019.11.19 |
| [JSP] 액션태그 (0) | 2019.11.05 |
| [JSP] XML/JSP 페이지에서 에러 페이지 연결 시키기 (0) | 2019.11.05 |
https://dev.mysql.com/downloads/installer/
MySQL :: Download MySQL Installer
Select Operating System: Select Operating System… Microsoft Windows Select OS Version: All Windows (x86, 32-bit) Windows (x86, 32-bit), MSI Installer 8.0.18 18.6M (mysql-installer-web-community-8.0.18.0.msi) MD5: c509966c1033462027a009cc51a98c74 | Signatur
dev.mysql.com
용량작은건 인터넷 사용해서 받아오는 형식의 설치
용량많은건 한번에 다받아서 설치하기
둘다 같은 파일!
다 설치하고 나면
cmd - Mysql -u root -p 입력후
password입력하면 끝.
workbench도 깔았다면 workbench로 접속도 가능
'JSP' 카테고리의 다른 글
| [JSP] ajax 통신 : json / jsonObject/jsonArray (0) | 2020.01.19 |
|---|---|
| [JSP] [naver검색 API사용해보기] [java] jsonString을 jsonObject로 파싱 (0) | 2020.01.19 |
| [JSP] 예시 ] SQL_QUERY , 내장객체 세션, 절대 경로 (0) | 2019.11.19 |
| [JSP] 액션태그 (0) | 2019.11.05 |
| [JSP] XML/JSP 페이지에서 에러 페이지 연결 시키기 (0) | 2019.11.05 |
[절대 경로]
/웹프로젝트명/컨텍스트패스 생략하고 컨텍스트패스폴더바로 안부터
<a href="/FunWeb/index.jsp">[session]
내장객체 영역에 저장되어 있는 세션값 얻기
String id = (String) session.getAttribute("id");[SQL]
SELECT * FROM 테이블명;
[ID 중복 로직]
int idCheck(String id)
int check = 0;
sql = "select * from member where id = ?";
//rs
if(rs.next()) // 검색한 데이터가 있으면 아이디 중복
{
check = 1;
}
else // 검색한 데이터가 존재 하지 않으면 아이디 중복 아님
{
check = 0;
}
'JSP' 카테고리의 다른 글
| [JSP] [naver검색 API사용해보기] [java] jsonString을 jsonObject로 파싱 (0) | 2020.01.19 |
|---|---|
| [JSP] MySQL 설치 (0) | 2019.12.01 |
| [JSP] 액션태그 (0) | 2019.11.05 |
| [JSP] XML/JSP 페이지에서 에러 페이지 연결 시키기 (0) | 2019.11.05 |
| [JSP]포워딩 (0) | 2019.11.04 |
인클루드 액션 태그
<jsp:include>
인클루드 디렉티브 태그처럼 화면을 분할해서 관리하는데 사용
재사용성 향상
(= 레이아웃 모듈화)
액션 < - > 디렉티브
| 인클루드 액션 태그 | 인클루드 디렉티브 태그 |
| JSP 레이아웃 모듈화 | |
| 요청 시간에 처리 | JSP를 자바코드로 변환 시킬 때 |
| param 액션 태그를 이용해서 동적 처리 가능 | 정적 처리만 가능 |
| a.jsp / b.jsp 각각 자바 파일로 생성 | a.jsp / b.jsp 가 있으면 a.jsp에서 인클루드 했을 경우에 b.jsp 소스 내용을 a.jsp 위치에 포함 시켜버린다. |
<인클루드 액션 태그>
a.jsp / b.jsp
a.jsp 실행 도중에 인클루드 액션 태그가 발생한 지점에서 b.jsp로 제어권이 넘어 갔다가 b.jsp를 실행하고 다시
a.jsp가 제어권을 돌려받고 인클루드 액션 태그가 발생한 b.jsp지점 이후로 실행이 계속 실행됨.
<인클루드 디렉티브 태그>
a.jsp / b.jsp
a.jsp
소스 코드....
+ b.jsp 코드
<jsp:include page = "JSP페이지" flush = "true" 또는 "false">
</jsp:include>
예시)
	<jsp:include page="duke_image.jsp">

		<jsp:param value="듀크2" name="name"/>
		<jsp:param value="duke2.png" name="imageName"/>

	</jsp:include>
포워드 액션 태그
<jsp:forward>
Servlet의 RequestDispatcher 클래스
Dispatcher 방식은 현재의 JSP페이지에서 거치지 않고 재요청
login.jsp
<%@ page language="java" contentType="text/html; charset=EUC-KR"
    pageEncoding="EUC-KR"%>
<!DOCTYPE html PUBLIC "-//W3C//DTD HTML 4.01 Transitional//EN" "http://www.w3.org/TR/html4/loose.dtd">
<html>
<head>
<meta http-equiv="Content-Type" content="text/html; charset=EUC-KR">
<title>Insert title here</title>
</head>
<body>
	<h1> 아이디를 입력하지 않았습니다. 아이디를 입력 해주세요 </h1>
	<form action = "result.jsp" method = "post">
		아이디 : <input type = "text" name = "user_id"> <br>
		비밀번호 : <input type = "password" name = "user_pw"> <br>
		<input type = "submit" value = "로그인">
		<input type = "reset" value = "다시입력">
	</form>
</body>
</html>
result.jsp
<%@ page language="java" contentType="text/html; charset=EUC-KR"
    pageEncoding="EUC-KR"%>
<!DOCTYPE html PUBLIC "-//W3C//DTD HTML 4.01 Transitional//EN" "http://www.w3.org/TR/html4/loose.dtd">
<html>
<head>
<meta http-equiv="Content-Type" content="text/html; charset=EUC-KR">
<title>Insert title here</title>
</head>
<body>
	<%
		request.setCharacterEncoding("utf-8");
		String userID = request.getParameter("user_id");

		if(userID.length() == 0)
		{
// 			RequestDispatcher dispatcher = request.getRequestDispatcher("login.jsp");
%>
			<%--ID를 입력하지 않았으면 다시 <jsp : forward> 태그를 사용해 로그인 창으로
			포워딩 --%>
			<jsp:forward page = "login.jsp"/>
<%
		}
%>
		<h1>환영합니다 <%=userID %>님~!</h1>
</body>
</html>
유즈빈 액션 태그
'JSP' 카테고리의 다른 글
| [JSP] MySQL 설치 (0) | 2019.12.01 |
|---|---|
| [JSP] 예시 ] SQL_QUERY , 내장객체 세션, 절대 경로 (0) | 2019.11.19 |
| [JSP] XML/JSP 페이지에서 에러 페이지 연결 시키기 (0) | 2019.11.05 |
| [JSP]포워딩 (0) | 2019.11.04 |
| [JSP] session scope 와 application scope 차이 (0) | 2019.11.04 |
XML
 <!-- 404와 500오류 발생시 예외처리를 할 페이지 지정 -->
  <error-page>
  	<error-code>404</error-code>
  	<location>/err/error_404.jsp</location>
  </error-page>

  <error-page>
  	<error-code>500</error-code>
  	<location>/err/error_500.jsp</location>
  </error-page>
<error-code> 코드 번호 </error-code>
<location> 연결 주소 </location>
JSP
add.html
<!DOCTYPE html>
<html>
<head>
<meta charset="utf-8">
<title>Insert title here</title>
	<!--
		입력창에서 숫자를 입력 받아 action 속성에 지정한 add.jsp로 요청 전송 합니다.
	 -->

	<script type="text/javascript" src="http://code.jquery.com/jquery-3.1.1.js"></script>
	<script type="text/javascript">

	</script>
</head>
<body>
	자연수를 입력하세요.
	<form action="add.jsp">
		1부터 <input type = "text" name = "num">
		<input type = "submit" value = "계산하기">
	</form>
</body>
</html>
add.jsp
<%@ page language="java" contentType="text/html; charset=utf-8"
    pageEncoding="utf-8"%>

<%@ page errorPage="addException.jsp" %>
<%--예외 발생시 예외를 처리할 JSP페이지를 지정함. --%>

<%
	int num =  Integer.parseInt(request.getParameter("num"));

	int sum = 0;

	for (int i = 1; i <= num ; i++)
	{
		sum += i;
	}
	out.println("합은 ? " + sum);

%>

<!DOCTYPE html PUBLIC "-//W3C//DTD HTML 4.01 Transitional//EN" "http://www.w3.org/TR/html4/loose.dtd">
<html>
<head>
<meta http-equiv="Content-Type" content="text/html; charset=utf-8">
<title>합계 구하기</title>
</head>
<body>
	<h2>합계 구하기</h2>
	<h1>1부터 <%=num %> 까지의 합은 <%=sum %>입니다.</h1>

</body>
</html>
addException.jsp
<%@ page language="java"
	contentType="text/html; charset=utf-8"
    pageEncoding="utf-8"
	isErrorPage = "true"
%>
<%-- 다른 JSP 페이지에서 예외 발생시 예외를 처리하는 예외 처리 페이지로 지정할 건지 여부 --%>
<%--
	Page지시자 태그의 isErrorPage 속성값을 true로 설정해
    exception 내장 객체를 이용해서 발생한 예외를 처리 하도록 합니다.
    이 때 exception 내장 객체는 자바의 Exception클래스의 인스턴스 입니다.
      --%>
<!DOCTYPE html PUBLIC "-//W3C//DTD HTML 4.01 Transitional//EN" "http://www.w3.org/TR/html4/loose.dtd">
<html>
<head>
<meta http-equiv="Content-Type" content="text/html; charset=utf-8">
<title>Insert title here</title>
</head>
<body>

	==============================toString() 내용===========================<br>
	<%-- exception내장 객체를 사용해 예외 처리를 합니다. --%>
	<h1> <%=exception.toString() %> </h1>

	==============================getMessage() 내용 ========================<br>
	<h1><%=exception.getMessage() %></h1>

	==============================printStackTrace() 내용 ===================<br>
	<h1><% exception.printStackTrace(); %></h1>
	<h3>숫자만 입력가능합니다. 다시 시도하세요</h3>
	<a href = "add.html">다시 하기</a>

</body>
</html>
예외 처리할 페이지에서
<%@ page ErrorPage = "에러시 연결할 페이지"%>
에러시 연결된 페이지에서
<%@ page isErrorPage = "true"%>
'JSP' 카테고리의 다른 글
| [JSP] 예시 ] SQL_QUERY , 내장객체 세션, 절대 경로 (0) | 2019.11.19 |
|---|---|
| [JSP] 액션태그 (0) | 2019.11.05 |
| [JSP]포워딩 (0) | 2019.11.04 |
| [JSP] session scope 와 application scope 차이 (0) | 2019.11.04 |
| [JSP] 영역 객체와 속성 (0) | 2019.11.02 |
포워딩 방식
거쳐서 포워딩
response.sendRedirect("request2.jsp");현재페이지에서 포워딩
request.getRequestDispatcher("request2.jsp");

RequestDispatcher dispatch = request.getRequestDispatcher("request2.jsp");

dispatch.forward(request, response);
'JSP' 카테고리의 다른 글
| [JSP] 액션태그 (0) | 2019.11.05 |
|---|---|
| [JSP] XML/JSP 페이지에서 에러 페이지 연결 시키기 (0) | 2019.11.05 |
| [JSP] session scope 와 application scope 차이 (0) | 2019.11.04 |
| [JSP] 영역 객체와 속성 (0) | 2019.11.02 |
| [JSP] config - 객체 (0) | 2019.11.02 |
<%@ page language="java" contentType="text/html; charset=EUC-KR"
    pageEncoding="EUC-KR"%>

<%
	//이름정보를 세션 영역에 저장(바인딩)합니다.
	session.setAttribute("name", "이순신");

	//주소 정보를? application영역에 저장(바인딩)
	application.setAttribute("address", "부산시 부산진구");

%>
<html>
<head>

</head>
<body>
		<h1>이름과 주소를 저장합니다.</h1>
		<a href = "appTest2.jsp">두 번째 웹 페이지로 이동합니다.</a>
</body>

</html>
<%@ page language="java" contentType="text/html; charset=EUC-KR"
pageEncoding="EUC-KR"%>
<%
String name = (String)session.getAttribute("name");
String address = (String)application.getAttribute("address");
%>
<h1>이름은 <%=name %>입니다.</h1>
<h1>주소는 <%=address %>입니다.</h1>application 범위는
톰캣이 종료되기전까지 유효하므로 다른 웹브라우저에서도 값이 표현됨
'JSP' 카테고리의 다른 글
| [JSP] XML/JSP 페이지에서 에러 페이지 연결 시키기 (0) | 2019.11.05 |
|---|---|
| [JSP]포워딩 (0) | 2019.11.04 |
| [JSP] 영역 객체와 속성 (0) | 2019.11.02 |
| [JSP] config - 객체 (0) | 2019.11.02 |
| [JSP] out - 객체 (0) | 2019.11.02 |
영역 객체 (Scope)와 속성(Attribute)
JSP에서 제공하는 내장 객체 중 session, request, application 객체들은 해당 객체에 정의된 유효 범위 안에서 필요한 데이터를 저장하고 읽어오며 서로 공유할 수 있는 특정한 영역이 있다.
공유되는 데이터를 (Attribute)속성
속성을 공유하는 유효 범위를 (Scope)영역
session 내장 객체는 세션이 유지되고 있는 동안에 값이 유효하고 세션이 종료 되는 순간에 반환된다.(버림)
request 객체는 클라이언트 요청이 처리되는 동안에 데이터를 사용할 수 있고,
application 객체는 해당 웹 어플리케이션이 실행되는동안 유효하다.
| 영역 | 영역 객체 | 속성의 유효 범위 |
| page | pageContext | 해당 페이지가 클라이언트에 서비스를 제공하는 동안에만 유효(서블릿 인스턴스 _jspService() 메소드가 실행되는 동안에만 유효) |
| request | request | 클라이언트의 요청이 처리되는 동안 유효 |
| session | session | 세션이 유지되는 동안 유효(하나의 브라우저(클라이언트)에 1개의 세션이 생성 |
| application | application | 웹 어플리케이션이 실행되고 있는 동안 유효 |
| 리턴 | 메소드명 | 해설 |
| Object | getAttribute(String key) | key 값으로 등록되어 있는 속성을 Object 타입으로 리턴 (key 값에 해당하는 속성이 없을 경우 null을 리턴) |
| Enumeration | getAttributeNames() | 해당 영역에 등록되어 있는 모든 속성들의 이름을 Enumeration 타입으로 리턴 |
| 없음 | setAttribute(String key, Object obj) | 해당 영역에 key 값의 이름으로 obj 객체를 등록 |
| 없음 | removeAttribute(String key) | key 값으로 등록되어 있는 속성을 제거 |
예제
<attributeTest1_Form.jsp>
<%@ page language="java" contentType="text/html; charset=utf-8"
    pageEncoding="utf-8"%>
<!DOCTYPE html>
<html>
<head>
<meta charset="utf-8">
<title>Insert title here</title>
</head>
<body>
<h2>영역과 속성 테스트</h2>
<form action = "attributeTest1.jsp" method ="post">
<table border = "1">
	<tr>
		<td colspan = "2"> Application 영역에 저장할 내용들 </td>
	</tr>

	<tr>
		<td>이름 </td>
		<td><input type = "text" name = "name"></td>
	</tr>

	<tr>
		<td>아이디</td>
		<td><input type = "text" name = "id"></td>
	</tr>

	<tr>
		<td colsapn = "2"> <input type = "submit" value ="전송"></td>
	</tr>

</table>
</form>
</body>
</html>
<attributeTest1.jsp>
<%@ page language="java" contentType="text/html; charset=utf-8"
pageEncoding="utf-8"%>
<!DOCTYPE html>
<html>
<head>
<meta charset="utf-8">
<title>Insert title here</title>
</head>
<body>
<h2>영역과 속성 테스트</h2>
<%
request.setCharacterEncoding("UTF-8");
String name = request.getParameter("name");
String id = request.getParameter("id");
if(name!=null && id!= null)
{
application.setAttribute("name", name);
application.setAttribute("id", id);
}
%>
<h3><%=name %>님 반갑습니다.<br> <%=name %> 님의 아이디는 <%=id %> 입니다</h3>
<form action = "attributeTest2.jsp" method = "post">
<table border = "1">
<tr>
<td colsapn = "2"> Session 영역에 저장할 내용들 </td>
</tr>
<tr>
<td>
e-mail 주소
</td>
<td>
<input type = "text" name = "email">
</td>
</tr>
<tr>
<td>집 주소</td>
<td><input type = "text" name = "address">
</tr>
<tr>
<td> 전화번호</td>
<td> <input type = "text" name = "tel">
</tr>
<tr>
<td colspan = "2"><input type ="submit" value = "전송"></td>
</tr>
</table>
</form>
</body>
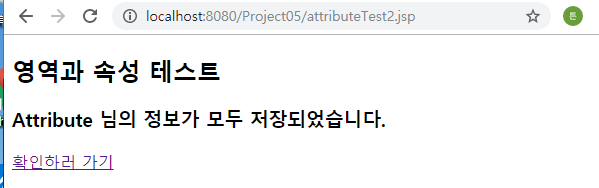
</html><attributeTest2.jsp>
<%@ page language="java" contentType="text/html; charset=utf-8"
pageEncoding="utf-8"%>
<!DOCTYPE html>
<html>
<head>
<meta charset="utf-8">
<title>Attribute Test</title>
</head>
<body>
<h2>영역과 속성 테스트</h2>
<%
request.setCharacterEncoding("UTF-8");
String email = request.getParameter("email");
String address = request.getParameter("address");
String tel = request.getParameter("tel");
session.setAttribute("email", email);
session.setAttribute("address", address);
session.setAttribute("tel", tel);
String name = (String)application.getAttribute("name");
%>
<h3><%=name %> 님의 정보가 모두 저장되었습니다.</h3>
<a href = "attributeTest3.jsp"> 확인하러 가기 </a>
</body>
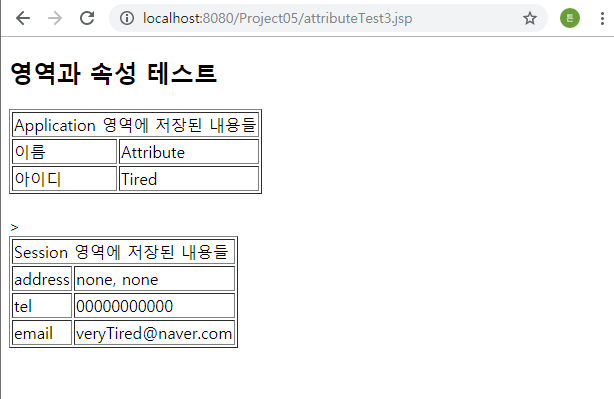
</html><attributeTest3.jsp>
<%@ page language="java" contentType="text/html; charset=utf-8"
    pageEncoding="utf-8"%>

<%@ page import = "java.util.Enumeration" %>
<!DOCTYPE html>
<html>
<head>
<meta charset="utf-8">
<title>Attribute Test</title>
</head>
<body>
	<h2>영역과 속성 테스트</h2>
	<table border = "1">
		<tr>
			<td colspan="2">Application 영역에 저장된 내용들</td>
		</tr>

		<tr>
			<td>이름</td>
			<td><%=application.getAttribute("name")%></td>
		</tr>

		<tr>
			<td>아이디</td>
			<td><%=application.getAttribute("id")%></td>
		</tr>
	</table>
	<br>
	<table border ="1">>
		<tr>
			<td colspan="2">Session 영역에 저장된 내용들 </td>
		</tr>
	<%
	Enumeration e = session.getAttributeNames();
	while(e.hasMoreElements())
	{
	    String attributeName = (String)e.nextElement();
	    String attributeValue = (String)session.getAttribute(attributeName);
	    %>
	    <tr>
	    	<td>
	    		<%=attributeName %>
	    	</td>

	    	<td>
	    		<%=attributeValue %>
	   		</td>
	   	</tr>
	   	<%
	}
	%>
	</table>
</body>
</html>


'JSP' 카테고리의 다른 글
| [JSP]포워딩 (0) | 2019.11.04 |
|---|---|
| [JSP] session scope 와 application scope 차이 (0) | 2019.11.04 |
| [JSP] config - 객체 (0) | 2019.11.02 |
| [JSP] out - 객체 (0) | 2019.11.02 |
| [JSP] application - 객체 (0) | 2019.11.02 |
config
| 리턴 | 메소드명 | 설명 |
| String | getInitParameter(String init_paramName) |
컨테이너의 설정 파일에 저장되어 있는 초기 파라미터 값 중 init_paramName의 이름을 가진 파라미터 값을 리턴하다. init_paramName의 이름을 가진 파라미터가 없을 경우 null 리턴하다. |
| Enumeration | getInitParameterNames() | 컨테이너의 설정 파일에 저장되어 있는 모든 초기 파라미터 이름을 Enumeration 타입으로 리턴한다. |
| String | getServletName() | 해당 서블릿의 이름을 문자열로 리턴하다. |
<%@ page language="java" contentType="text/html; charset=utf-8"
    pageEncoding="utf-8"%>

<%@page import = "java.util.Enumeration" %>
<html>
<head>
<title>Config Test</title>
</head>

<body>
<h2>config 테스트</h2>
<table border = "1">
	<tr>
		<td>
			초기 파라미터 이름
		</td>

		<td>
			초기 파라미터 값
		</td>
	</tr>
	<%
		Enumeration e = config.getInitParameterNames();
		while (e.hasMoreElements())
		{
		    String init_paramName = (String)e.nextElement();
		    %>
		    <tr>
		    	<td><%=init_paramName %></td>
		    	<td><%=config.getInitParameter(init_paramName) %></td>
		    </tr>
		    <%
		}
	%>
</table>
</body>
</html>
'JSP' 카테고리의 다른 글
| [JSP] session scope 와 application scope 차이 (0) | 2019.11.04 |
|---|---|
| [JSP] 영역 객체와 속성 (0) | 2019.11.02 |
| [JSP] out - 객체 (0) | 2019.11.02 |
| [JSP] application - 객체 (0) | 2019.11.02 |
| [JSP] Session 객체 (0) | 2019.11.02 |
out 객체
out 객체는 서블릿/JSP 컨테이너가 응답 페이지를 만들기 위해 사용하는 출력 스트림 객체로
java.io.Writer 클래스를 상속한 javax.servelt.jsp.Jspwriter 클래스 타입으로 생성된다.
주로 응답페이지를 만들어낼 때 쓴다.
| 리턴 | 메소드명 | 설명 |
| 없음 | clear() | 출력 버퍼에 저장된 내용을 버린다. 만일 이미 버퍼가 다 채워져서 클라이언트로 전송되었을 경우에는 예외를 발생 |
| 없음 | clearBuffer() | 출력 버퍼에 저장되 내용을 버린다. clear() 메소드와는 다르게 버퍼에 담긴 내용이 이미 전송된 이후에도 예외를 발생시키지 않고 현재 저장된 버퍼만 버림 |
| 없음 | flush() | 현재 버퍼에 저장되어 있는 내용을 클라이언트로 전송하고 버퍼를 비운다 |
| 없음 | close() | 출력 버퍼를 클라이언트로 전송하고 출력 스트림을 종료한다 |
| boolean | isAutoFlush() | page 지시어의 autoFlush 속성으로 지정된 값을 리턴한다. 즉 출력 버퍼가 다채워졌을 때 버퍼 내용을 클라이언트로 전송하도록 지정되어 있으면 true리턴, 출력버퍼가 다 채워졌을 때 예외가 발생하도록 지정되어 있으면 false리턴 |
| int | getBufferSize() | 출력 버퍼의 크기를 바이트 단위로 계산하여 정수 값으로 리턴 |
| int | getRemaining() | 출력 버퍼의 남은 양을 바이트 단위로 계산하여 정수 값으로 리턴 |
| 없음 | print(String str) | 출력 스트림으로 str 문자열을 출력한다 |
<%@ page language="java" contentType="text/html; charset=utf-8"
    pageEncoding="utf-8"%>

<h2>1부터 100까지의 합은?
	<%
		int sum = 0;
		for(int i = 1; i <= 100; i++)
		{
		    sum += i;
		}
	%>
	<%=sum %> 입니다 </h2>
<%@ page language="java" contentType="text/html; charset=UTF-8"
    pageEncoding="UTF-8"%>

    <h2>1부터 100까지의 합은</h2>
    <%
    	int sum = 0;
    	for(int i = 1; i < 100; i++)
    	{
    	    sum += i;
    	}
    	out.print(sum + "입니다.</h2>");
    %>
<%@ page language="java" contentType="text/html; charset=utf-8"
pageEncoding="utf-8"%>
<!DOCTYPE html>
<html>
<head>
<meta charset="utf-8">
<title>out object</title>
</head>
<body>
<h2>out 객체</h2>
<table border = '1'>
<tr>
<td>autoFlush 여부 </td>
<td><%=out.isAutoFlush() %></td>
</tr>
<tr>
<td>출력 버퍼의 크기</td>
<td><%=out.getBufferSize() %> 바이트 </td>
</tr>
<tr>
<td>출력 버퍼의 남은 양</td>
<td><%=out.getRemaining() %> 바이트 </td>
</tr>
</table>
</body>
</html>
'JSP' 카테고리의 다른 글
| [JSP] 영역 객체와 속성 (0) | 2019.11.02 |
|---|---|
| [JSP] config - 객체 (0) | 2019.11.02 |
| [JSP] application - 객체 (0) | 2019.11.02 |
| [JSP] Session 객체 (0) | 2019.11.02 |
| [JSP] pageContext 객체 (0) | 2019.11.02 |
Application 객체
application 객체는 javax.servlet.ServletContext 클래스를 상속받아 웹 컨테이너가 구현하여
제공하는 객체.
1. 해당 웹 어플리케이션의 실행 환경을 제공하는 서버의 정보를 얻거나
2. 서버측 자원에 대한 정보를 얻거나
3. 해당 어플리케이션의 이벤트 로그를 다루는 메소드를 제공
| 리턴 | 메소드명 | 설명 |
| int | getMajorVersion() | Servlet api 스펙의 Major 버전을 int로 리턴 |
| int | getMinorVersion() | Servlet api 스펙의 Minor 버전을 int로 리턴 |
| String | getServerInfo() | 서블릿/JSP 컨테이너의 이름과 버전을 문자열로 리턴 |
| String | getMimeType(String file) | 서버에 존재하는 file이란 이름을 가진 파일의 MIME타입을 문자열로 리턴 |
| java.net.URL | getResource(String path) | path로 지정된 경로의 자원을 url객체로 리턴. 없으면null |
| inputStream | getResourceAsStream(String path) | path로 지정된 경로의 자원을 InputStream 객체로 리턴. 없으면 null |
| String | getRealPath(String path) | path로 지정된 경로의 자원을 서버의 실제 파일 시스템상의 경로로 바꾸어 문자열로 리턴 |
| 없음 | log(String msg) | 문자열 msg를 서블릿 로그 파일에 기록 |
| 없음 | log(String msg, java.lang.Throwable exception) | 문자열 msg와 예외의 StackTrace 정보를 로그 파일에 기록 한다. |
<%@ page language="java" contentType="text/html; charset=utf-8"
    pageEncoding="utf-8"%>
<!DOCTYPE html>
<html>
<head>
<meta charset="utf-8">
<title>Application Test</title>
</head>
<body>
	<h2>
		application 테스트
	</h2>
<table border = "1">
	<tr>
		<td> JSP 버전 </td>
		<td> <%=application.getMajorVersion() %>.<%=application.getMinorVersion() %>
	</tr>

	<tr>
		<td> 컨테이너 정보 </td>
		<td> <%=application.getServerInfo() %></td>
	</tr>

	<tr>
		<td> 웹 어플리케이션의 실제 파일시스템 경로 </td>
		<td> <%=application.getRealPath("/") %> </td>
	</tr>
</table>
</body>
</html>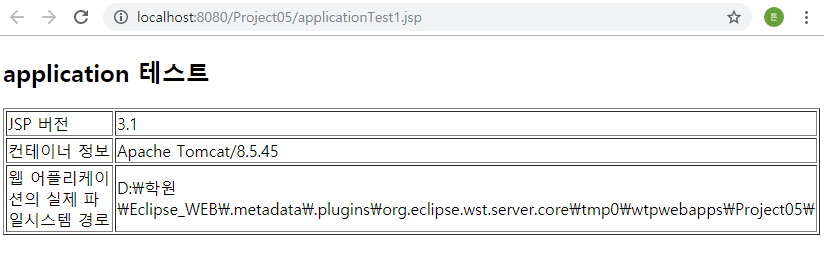
'JSP' 카테고리의 다른 글
| [JSP] config - 객체 (0) | 2019.11.02 |
|---|---|
| [JSP] out - 객체 (0) | 2019.11.02 |
| [JSP] Session 객체 (0) | 2019.11.02 |
| [JSP] pageContext 객체 (0) | 2019.11.02 |
| [JSP] Session 객체 - 메소드 (0) | 2019.11.02 |
Http 프로토콜 요청
http 프로토콜은 request/response (요청 응답) 구조로 서버가 요청에 대한 응답을 끝낸다면 연결이 끊어지게 된다.
따라서, 정보가 유지되어야 할 필요가 있을 때 가상 연결(Virtual Connection)이라는 개념의 세션이 생겼고
JSP 에서는 이러한 세션을 session 내장 객체를 이용하여 구현해 준다.
예
웹사이트에서 접속을 하고 보안상의 이유로 페이지의 요청없이 일정시간이 지나면 자동으로 로그인 세션이 만료되었다는 메세지를 출력하고 강제로 로그아웃이 되버린다.
넥슨 게임 어플에서 현재 로그인된 연결들을 보여주면서 강제로 끊어줄 수 있다.
| 리턴 타입 | 메소드명 | 설명 |
| String | getId() | 해당 세션의 세션 id를 문자열로 리턴해줌. session 객체 생성 시에 웹 컨테이너에 의해 자동으로 할당(만들어짐) |
| long | getCreationTime() | 1970년 1월 1일 00시 00분 00초(epoch)부터 해당 세션이 생성된 순간까지의 경과 시간을 밀리초로 계산하여 long형으로 리턴한다. |
| long | getlastAccessedTime() | epoch로 부터 해당 세션에 마지막으로 접근된 시간까지의 경과 시간을 밀리초로 계산하여 long형으로 리턴한다 |
| int | getMaxInactiveInterval() | 클라이언트의 요청이 없을 시 서버가 해당 세션을 유지하도록 지정된 시간을 초 단위의 정수로 리턴한다. |
| 없음 | invalidate() | 세션의 속성 값으로 저장된 모든 객체를 반납하여 해당 세션을 종료 시킨다 |
| boolean | isNew() | 새로운 세션일 경우 true를 리턴하고 기존에 세션이 유지되고 있으면 false를 리턴 |
| 없음 | setMaxInactiveInterval(int seconds) | 클라이언트의 요청이 없더라도 세션을 유지할 시간을 초단위의 정수값으로 설정한다. 음수로 설정하면 세션은 계속 유지된다. |
| 없음 | forward(String url) | 현재 페이지의 요청과 응답에 관한 제어권을 URL로 지정된 주소로 영구적으로 넘긴다. forward된 페이지의 요청 처리가 종료되면 응답도 종료된다 |
| 없음 | include(String url) | 현재 페이지의 요청과 응답에 관한 제어권을 URL로 지정된 주소로 임시로 넘긴다. include된 페이지의 처리가 끝나면 제어권은 다시 원래의 페이지로 돌아온다. |
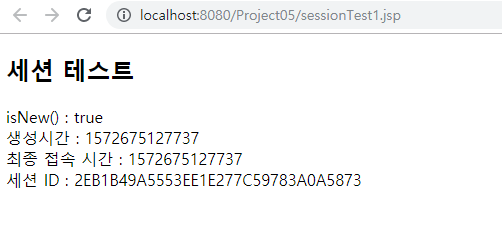
<%@ page language="java" contentType="text/html; charset=utf-8"
    pageEncoding="utf-8"%>

<%
	session.setMaxInactiveInterval(10);
%>
<!DOCTYPE html>
<html>
<head>
<meta charset="utf-8">
<title>session test</title>
</head>
<body>
<h2>세션 테스트</h2>
isNew() : <%=session.isNew() %><br>
생성시간 : <%=session.getCreationTime() %> <br>
최종 접속 시간 : <%=session.getLastAccessedTime() %><br>
세션 ID : <%=session.getId() %><br>

</body>
</html>
session.setMaxInactiveInterval(10); 10초 !
10초가 지나기 전까진 세션 ID 이 유지되어 isNew() : false 이다가
10초가 지난후에 새로 고침해버리면 true로 바뀐다
'JSP' 카테고리의 다른 글
| [JSP] out - 객체 (0) | 2019.11.02 |
|---|---|
| [JSP] application - 객체 (0) | 2019.11.02 |
| [JSP] pageContext 객체 (0) | 2019.11.02 |
| [JSP] Session 객체 - 메소드 (0) | 2019.11.02 |
| [JSP] 내장객체 - http헤더 (0) | 2019.11.02 |
| 리턴 | 메소드 | 설명 |
| ServletRequest | getRequest() | 클라이언트의 요청 정보를 담고 있는 객체를 리턴한다 |
| ServletResponse | getResponse() | 요청에 대한 응답 객체를 리턴한다(response 내장 객체를 리턴 한다). |
| JspWriter | getOut() | 응답 출력 스트림을 리턴한다(out 내장 객체를 리턴) |
| Object | getPage() | 서블릿 인스턴스 객체를 리턴한다(page 내장 객체를 리턴한다) |
| ServletConfig | getServletConfig() | 서블릿의 초기 설정 정보를 담고 있는 객체리턴(Config 내장객체 리턴) |
| ServletContext | getServletContext() | 서블릿의 실행 환경 정보를 담고 있는 객체를 리턴한다.(application 내장 객체를 리턴한다) |
| HttpSession | getSession() | 클라이언트의 세션 정보를 담고 있는 객체를 리턴한다(session 내장 객체를 리턴한다) |
| 없음 | forward(String url) | 현재 페이지의 요청과 응답에 대한 제어권을 영구적으로 forward시키는 주소로 넘긴다. |
| 없음 | include(String url) | 현재 페이지의 요청과 응답에 대한 제어권을 URL로 지정된 주소로 임시로 넘긴다. include 된 페이지의 처리가 끝나면 제어권은 다시 원래의 페이지로 돌아온다. |
<pageContextTest1.jsp>
<%@ page language="java" contentType="text/html; charset=utf-8"
    pageEncoding="utf-8"%>
<%
	pageContext.forward("pageContextTest2.jsp");
%>
<pageContextTest2.jsp>
<%@ page language="java" contentType="text/html; charset=utf-8"
    pageEncoding="utf-8"%>
<!DOCTYPE html>
<html>
<head>
<meta charset="utf-8">
<title>pageContextTest1에서 포워딩된 페이지</title>
</head>
<body>

<%
	pageContext.include("pageContextTest3.jsp");
%>
<h2>pageContextTest1.jsp의 forward 메소드로 포워딩된 페이지입니다</h2>
</body>
</html>
<pageContextTest3.jsp>
<%@ page language="java" contentType="text/html; charset=utf-8"
    pageEncoding="utf-8"%>
<!DOCTYPE html>
<html>
<head>
<meta charset="utf-8">
<title>pageContextTest2를 include하는 페이지</title>
</head>
<body>
	<h3>include 되는 pageContextTest3.jsp</h3>
	<hr>
</body>
</html>
1) pageContextTest1.jsp에서 pageContextTest2.jsp로 포워드 메소드를 사용하여 이동하고 제어권을 넘겨받는다.
2) pageContextTest2.jsp에서 스크립틀릿의 include 메서드를 통해서
pageContextTest3.jsp으로 페이지를 요청하여 넘어가는 것이 아니라
pageContextTest2.jsp에서 pageContextTest3.jsp페이지의 내용을 나타내주는 기능을 함
3) 코드의 순서대로 pageContextTest3.jsp의 내용인
<h3>include 되는 pageContextTest3.jsp</h3>먼저 출력되고
pageContextTest2.jsp의 내용인
<h2>pageContextTest1.jsp의 forward 메소드로 포워딩된 페이지 입니다</h2>가 출력된다.

'JSP' 카테고리의 다른 글
| [JSP] application - 객체 (0) | 2019.11.02 |
|---|---|
| [JSP] Session 객체 (0) | 2019.11.02 |
| [JSP] Session 객체 - 메소드 (0) | 2019.11.02 |
| [JSP] 내장객체 - http헤더 (0) | 2019.11.02 |
| [JSP] 내장 객체 - request (0) | 2019.11.02 |
세션 메소드
| 리턴 | 메소드 | 설명 |
| httpSession | getSession |
요청한 클라이언트에 할당된 HttpSession 객체를 반환. 없다면 새로운 객체 생성 |
| HttpSession | getSession(Boolean create) |
create 가 true 이면 getSession() 메소드와 동일한 결과를 리턴. create 가 false로 지정하면 이전에 생성된 HttpSession 객체가 없을 경우 null을 리턴 |
| String | getRequestedSessionId() | 요청한 클라이언트에 지정된 세선의 ID를 문자열로 리턴한다. |
| boolean | isRequestedSessionIdValid() | 요청에 포함된 클라이언트의 세션ID가 유효하면 true 아니면 false 리턴 |
쿠키, URL/URI, 요청 방식 관련 메소드
| 리턴 | 메소드 | 설명 |
| Cookie[] | getCookies() | Http 요청 메세지의 헤더에 포함된 쿠키를 javax.servlet.http.Cookie 배열로 리턴 |
| String | getServerName() | 서버의 도메인명을 문자열로 리턴 |
| int | getServerPort() | 서버의 포트번호를 int형으로 리턴 |
| StringBuffer | getRequestURL() | 요청 URL을 StringBuffer로 리턴 |
| String | getRequestURI() | 요청URI를 문자열로 리턴 |
| String | getQueryString() | 요청에 사용된 쿼리 문장을 문자열로 리턴 |
| String | getRemoteHost() | 클라이언트의 호스트 이름을 문자열로 리턴 |
| String | getRemoteAddr() | 클라이언트 IP주소를 문자열로 리턴 |
| String | getProtocol() | 요청에 사용된 프로토콜 이름을 문자열로 리턴 |
| String | getMethod() | 요청에 사용된 요청 방식(Get,Post)를 문자열로 리턴 |
| String | getContextPath() | 해당 JSP 페이지의 컨텍스트 경로를 문자열로 리턴 |
<%@ page language="java" contentType="text/html; charset=utf-8"
pageEncoding="utf-8"%>
<!DOCTYPE html>
<html>
<head>
<meta charset="utf-8">
<title>Request Test3</title>
<style type="text/css">
h1
{
text-align : center;
}
table
{
margin : auto;
width : 400px;
border : 1px solid red;
}
</style>
</head>
<body>
<h1>쿠키, URL/URI, 요청방식에 관련된 정보 예제</h1>
<table border = "1">
<tr>
<td>쿠키 정보</td>
<%
Cookie[] cookie = request.getCookies();
if(cookie == null)
{
%>
<td>쿠키가 존재하지 않습니다</td>
<%
}
else
{
for(int i = 0; i < cookie.length; i++)
{
%>
<td><%=cookie[i].getName() %>
<%=cookie[i].getValue() %>)
</td>
<%
}
}
%>
</tr>
<tr>
<td>서버 도메인명</td>
<td><%=request.getServerName() %>
</tr>
<tr>
<td>서버 포트번호</td>
<td><%=request.getServerPort() %>
</tr>
<tr>
<td>요청 URL </td>
<td><%=request.getRequestURL() %>
</tr>
<tr>
<td>요청 URI</td>
<td><%=request.getRequestURI() %>
</tr>
<tr>
<td>요청 쿼리</td>
<td><%=request.getQueryString() %>
</tr>
<tr>
<td>클라이언트 호스트명</td>
<td><%=request.getRemoteHost() %>
</tr>
<tr>
<td>클라이언트 IP 주소</td>
<td><%=request.getProtocol() %>
</tr>
<tr>
<td>프로토콜</td>
<td><%=request.getProtocol() %>
</tr>
<tr>
<td>요청 방식</td>
<td><%=request.getMethod() %></td>
</tr>
<tr>
<td>컨텍스트 경로</td>
<td><%=request.getContextPath() %></td>
</tr>
</table>
</body>
</html>

'JSP' 카테고리의 다른 글
| [JSP] Session 객체 (0) | 2019.11.02 |
|---|---|
| [JSP] pageContext 객체 (0) | 2019.11.02 |
| [JSP] 내장객체 - http헤더 (0) | 2019.11.02 |
| [JSP] 내장 객체 - request (0) | 2019.11.02 |
| [JSP] 서블릿 페이지-> JSP페이지/ JSP 스크립트 요소 (0) | 2019.10.30 |
http헤더
| 리턴 타입 | 메소드명 | 설명 |
| String / null | getHeader(String headerName) | http요청헤더의 headerName으로 지정된 할당된 값을 리턴 |
| Enumeration | getHeader(String headerName) | headerName으로 지정된 이름으로 할당된 모든 값을 java.util.Enumeration객체로 리턴 |
| Enumeration | getHeaderNames() | Http 요청 헤더에 포함된 모든 헤더 이름을 java.util.Enumeration 객체로 리턴한다. |
| int | getIntHeader(String headerName) | headerName 헤더의 값을 int 타입으로 리턴 |
<%@ page language="java" contentType="text/html; charset=utf-8"
    pageEncoding="utf-8"%>

<%@ page import = "java.util.Enumeration" %>
<html>
<head>
<meta charset="utf-8">
<title>Request Test2</title>
<style type="text/css">
h1
{
	text-align : center;
}

table
{
	margin : auto;
	width : 400px;
	border : 1px solid red;
}
</style>
</head>
<body>
	<h1>헤더정보 예제</h1>
	<table>
		<tr>
			<td>헤더이름</td>
			<td>헤더값</td>
		</tr>

		<%
		Enumeration e = request.getHeaderNames();
		while(e.hasMoreElements())
		{
		    String headerName = (String)e.nextElement();
		    %>
		    <tr>
		    <td><%=headerName %>
		    </td>
		    <td><%=request.getHeader(headerName) %>
		    </td>
		<%
		}
		%>
	</table>
</body>
</html>
'JSP' 카테고리의 다른 글
| [JSP] pageContext 객체 (0) | 2019.11.02 |
|---|---|
| [JSP] Session 객체 - 메소드 (0) | 2019.11.02 |
| [JSP] 내장 객체 - request (0) | 2019.11.02 |
| [JSP] 서블릿 페이지-> JSP페이지/ JSP 스크립트 요소 (0) | 2019.10.30 |
| [JSP]서블릿 (httpservlet) (0) | 2019.10.30 |
내장객체
JSP가 자바코드로 변환될 때! 자바 파일에 자동으로 추가되는 내장객체들에 의해서
JSP페이지에서는 Servlet페이지와는 다르게
request객체나 / PrintWriter out = response.getWriter() 프린트 객체로 out.print("<html>");이런식으로
써주던 걸 PrintWriter out = response.getWriter()객체 (출력스트림)을 알아서 생성해주어 out.print("<html>");바로 사용할 수 있다.
import 없이도 내장객체는 자유롭게 접근할 수 있다.

webapps와 work가 컨텍스트 폴더(프로젝트명)이고
C:\Program Files\Apache Software Foundation\Tomcat 8.5\work\Catalina\localhost\ROOT\org\apache\jsp
이런식으로 끝까지 폴더를 타고 들어가보면

저렇게 자바파일과 클래스 파일이 생성이 된다.
즉, JSP페이지는 웹 컨테이너-> sevlet class로 변환 되는 과정으로 사용자의 요청을 처리한다.
객체는 클래스타입 객체 = new 인스턴스(); 에서 인스턴스를 저장해놓은 변수를 객체라고함
| 내장 객체 변수명 | 설명 |
| request | http 요청 정보 저장한 객체 |
| response | http 요청에 대한 응답 객체 |
| session | 클라이언트의 세션정보를 저장 |
| pageContext | 페이지 실행에 필요한 컨텍스트 정보를 저장한 객체 |
| out | 응답 페이지 전송을 위한 출력 스트림 객체 |
| application | 동일한 애플리케이션의 컨텍스트 정보를 저장한 객체 |
| config | 해당 페이지의 서블릿 설정 정보(초기화 정보)를 저장한 객체 |
| page | 해당 페이지 서블릿 객체(인스턴스) |
| exception | 예외 처리를 위한 객체 |
위의 내장 객체 변수명으로는 사용자가 변수를 정의하면 jsp페이지가 서블릿 클래스로 변환될 때 추가되는 코드에 의해
중복이 발생한다. 따라서 위의 객체 변수명으로는 따로 변수를 생성하면 안된다.
JSP 페이지 내의 스크립틀릿 안에서 정의해서 안됨.!!
request객체
HTTP메세지 : HTTP 헤더 + HTTP본문으로 구성되어 있다.
웹 서버에서는 HTTP 메세지를 수신하여 요청이 서블릿/JSP을 호출하는 것으로 판단되면 (URI or 애노테이션)
서블릿/JSP 컨테이너에 요청을 넘겨준다.
이 때, HTTP HttpServletRequest 객체를 생성하고 이를 서블릿 인스턴스에 넘겨줌으로써 HTTP메세지를 수신한다.
request객체의 메소드
| 리턴타입 | 메소드명 | 설명 |
| String | getParameter(String name) | html의 속성중 name속성으로 내용을 가져옴 |
| String[] | getParameterValues(String name) | name이란 이름으로 지정된 파라미터의 모든 값을 String배열로 리턴 받는다. 주로 checkbox같은 name속성을 같게 주는 태그를 가져올 때 쓴다. |
| Enumeration | getParameterNames() | 요청에 포함된 모든 파라미터 이름을 java.util.Enumeration 객체로 리턴 |
requestForm.jsp
<%@ page language="java" contentType="text/html; charset=utf-8"
    pageEncoding="utf-8"%>

<html>
<head>
<title>request</title>

<style type="text/css">
/* h1태그, name이 commandCell인 태그 */
h1, #commandCell
{
/* 	텍스트 정렬 : 가운데 */
	text-align : center;
}

table
{
/* 	외부 여백 */
	margin : auto;
/* 가로 너비 */
	width : 400px;
/* 외곽선 */
	border : 1px solid red;
}
</style>
</head>
<body>
	<h1>Request 예제</h1>
	<form action = "requestTest.jsp" method = "post">
		<table>
			<tr>
				<td><label for = "name">이름</label></td>
				<td><input type = "text" name = "name" id = "name"></td>
			</tr>
			<tr>
				<td><label for = "gender">성별</label></td>
				<td>남<input type = "radio" name = "gender" value = "male" id = "gender">
				여 <input type = "radio" name = "gender" value = "female">
				</td>
			</tr>
			<tr>
				<td><label for = "hobby">취미</label></td>
				<td>독서<input type = "checkbox" name = "hobby" value = "독서" id = "hobby">
					게임<input type = "checkbox" name = "hobby" value = "게임">
					TV시청<input type = "checkbox" name = "hobby"	value = "TV시청">
					축구 <input type = "checkbox" name ="hobby" value = "축구">
					기타 <input type = "checkbox" name = "hobby" value = "기타">
				</td>
			</tr>

			<tr>
				<td colspan = "2" id = "commandCell"><input type = "submit" value = "전송"></td>
			</tr>
		</table>
	</form>
</body>
</html>
requestTest.jsp
<%@ page language="java" contentType="text/html; charset=utf-8"
pageEncoding="utf-8"%>
<%
request.setCharacterEncoding("utf-8");
%>
<html>
<head>
<title></title>
<style type="text/css">
h1
{
text-align : center;
}
table
{
margin : auto;
width : 400px;
border : 1px solid red;
}
</style>
</head>
<body>
<h1>RequestTest1_Form에서 요청될 페이지</h1>
<table>
<tr>
<td>이름</td>
<td><%=request.getParameter("name") %><td>
</tr>
<tr>
<td>성별</td>
<td>
<%
if(request.getParameter("gender").equals("male"))
{
%>
남자
<%
}
else
{
%>
여자
<%
}
%>
</td>
</tr>
<tr>
<td>취미</td>
<td>
<%
String[] hobby = request.getParameterValues("hobby");
for(int i = 0; i < hobby.length; i++)
{
%>
<%= hobby[i] %>
<%
}
%>
</td>
</tr>
</table>
</body>
</html>
'JSP' 카테고리의 다른 글
| [JSP] Session 객체 - 메소드 (0) | 2019.11.02 |
|---|---|
| [JSP] 내장객체 - http헤더 (0) | 2019.11.02 |
| [JSP] 서블릿 페이지-> JSP페이지/ JSP 스크립트 요소 (0) | 2019.10.30 |
| [JSP]서블릿 (httpservlet) (0) | 2019.10.30 |
| [JSP]SERVER.XML (0) | 2019.10.16 |
서블릿 페이지에서는
-자바코드에 html, css, javascript를 넣었음
-디자이너가 자바코드를 이해할 수 없음/ 자바코드 때문에 작성불편
-서블릿은 데이터베이스 로직(비즈니스 로직), 화면디자인이 같이 있어 유지 관리가 불편
이러한 단점을 해결하기 위해
JSP페이지가 나왔음.
JSP구성요소
HTML태그, CSS문법, 자바스크립트 코드, 자바코드
JSP 실행과정
1. 톰캣(컨테이너)에서 JSP파일을 자바 파일로 변환 ->
2. 자바파일을 클래스 파일로 컴파일 ->
3. 클래스파일 실행 후 코드들을 브라우저로 전송함
인클루드 디렉티브 태그
<%@ include file = "공통기능.jsp"%>
- 재사용성
- JSP 유지관리 용이
<%@ page language="java" contentType="text/html; charset=EUC-KR"
    pageEncoding="EUC-KR"%>
<!DOCTYPE html PUBLIC "-//W3C//DTD HTML 4.01 Transitional//EN" "http://www.w3.org/TR/html4/loose.dtd">
<html>
<head>
<meta http-equiv="Content-Type" content="text/html; charset=EUC-KR">
<title>Insert title here</title>
</head>
<body>
	<h1>안녕하세요. 쇼핑몰 중심 JSP 시작입니다!!</h1> <br>
	<hr>

	<!-- include 디렉티브 태그를 이용해 duke_image.jsp페이지의 소스를
	현재 페이지에 포함시킴 -->

	<%@ include file = "duke_image.jsp" %>

	<hr>
	<h1>안녕하세요. 쇼핑몰 중심 JSP 끝부분입니다.</h1>
</body>
</html>
<%@ page language="java" contentType="text/html; charset=EUC-KR"
    pageEncoding="EUC-KR"%>
<!DOCTYPE html PUBLIC "-//W3C//DTD HTML 4.01 Transitional//EN" "http://www.w3.org/TR/html4/loose.dtd">
<html>
<head>
<meta http-equiv="Content-Type" content="text/html; charset=EUC-KR">
<title>Insert title here</title>
</head>
<body>
		<!-- image 폴더의 duke_png를 표시함 -->
		<img alt = "duke" src = "./image/duke.png"">
</body>
</html>
인클루드 디렉티브 태그는
현재의 JSP파일기준으로
<%@ include file = "공통기능.jsp"%>
디렉티브 안쪽 태그에 있는 jsp파일을 포함하여 한개의 java파일로 생성된다.
JSP 스크립트 요소
1. 선언문 태그
<%!
	String name = "duke";
	public String getName()
	{
		return name;
	}
%>
JSP 주석
1. <%-- --%> -JSP방식 주석
2. <!-- --> - html주석
3. <% - java주석
//
/**/
%>
2. 스크립트 표현식
<%= 변수이름 %>
3. 스크립틀릿 기호 영역
<%--스크립틀릿 기호 영역에는 무조건 자바코드 작성 --%>
<%
	String age = request.getParameter("age");
%>'JSP' 카테고리의 다른 글
| [JSP] 내장객체 - http헤더 (0) | 2019.11.02 |
|---|---|
| [JSP] 내장 객체 - request (0) | 2019.11.02 |
| [JSP]서블릿 (httpservlet) (0) | 2019.10.30 |
| [JSP]SERVER.XML (0) | 2019.10.16 |
| [JSP] POST 방식과 getParameterValues (0) | 2019.10.07 |
https://docs.oracle.com/javaee/7/api/toc.htm
Java(TM) EE 7 Specification APIs
docs.oracle.com
- 서블릿.java에서 호출 되는 메서드
init() - 서블릿 요청시 처음 한 번만 호출됨
doGet() - 서블릿 요청 시 매번 호출됨
doPost() - 서블릿 요청 시 매번 호출됨
destroy() - 서블릿이 기능을 수행하고 메모리에서 소멸될 때 호출
'JSP' 카테고리의 다른 글
| [JSP] 내장 객체 - request (0) | 2019.11.02 |
|---|---|
| [JSP] 서블릿 페이지-> JSP페이지/ JSP 스크립트 요소 (0) | 2019.10.30 |
| [JSP]SERVER.XML (0) | 2019.10.16 |
| [JSP] POST 방식과 getParameterValues (0) | 2019.10.07 |
| [JSP] 이클립스에서 import javax.servlet에 오류 날 때 (0) | 2019.10.02 |
<?xml version='1.0' encoding='utf-8'?>
<!--
Licensed to the Apache Software Foundation (ASF) under one or more
contributor license agreements. See the NOTICE file distributed with
this work for additional information regarding copyright ownership.
The ASF licenses this file to You under the Apache License, Version 2.0
(the "License"); you may not use this file except in compliance with
the License. You may obtain a copy of the License at
http://www.apache.org/licenses/LICENSE-2.0
Unless required by applicable law or agreed to in writing, software
distributed under the License is distributed on an "AS IS" BASIS,
WITHOUT WARRANTIES OR CONDITIONS OF ANY KIND, either express or implied.
See the License for the specific language governing permissions and
limitations under the License.
-->
<!-- Note: A "Server" is not itself a "Container", so you may not
define subcomponents such as "Valves" at this level.
Documentation at /docs/config/server.html
-->
<Server port="8005" shutdown="SHUTDOWN">
<Listener className="org.apache.catalina.startup.VersionLoggerListener" />
<!-- Security listener. Documentation at /docs/config/listeners.html
<Listener className="org.apache.catalina.security.SecurityListener" />
-->
<!--APR library loader. Documentation at /docs/apr.html -->
<Listener className="org.apache.catalina.core.AprLifecycleListener" SSLEngine="on" />
<!-- Prevent memory leaks due to use of particular java/javax APIs-->
<Listener className="org.apache.catalina.core.JreMemoryLeakPreventionListener" />
<Listener className="org.apache.catalina.mbeans.GlobalResourcesLifecycleListener" />
<Listener className="org.apache.catalina.core.ThreadLocalLeakPreventionListener" />
<!-- Global JNDI resources
Documentation at /docs/jndi-resources-howto.html
-->
<GlobalNamingResources>
<!-- Editable user database that can also be used by
UserDatabaseRealm to authenticate users
-->
<Resource name="UserDatabase" auth="Container"
type="org.apache.catalina.UserDatabase"
description="User database that can be updated and saved"
factory="org.apache.catalina.users.MemoryUserDatabaseFactory"
pathname="conf/tomcat-users.xml" />
</GlobalNamingResources>
<!-- A "Service" is a collection of one or more "Connectors" that share
a single "Container" Note: A "Service" is not itself a "Container",
so you may not define subcomponents such as "Valves" at this level.
Documentation at /docs/config/service.html
-->
<Service name="Catalina">
<!--The connectors can use a shared executor, you can define one or more named thread pools-->
<!--
<Executor name="tomcatThreadPool" namePrefix="catalina-exec-"
maxThreads="150" minSpareThreads="4"/>
-->
<!-- A "Connector" represents an endpoint by which requests are received
and responses are returned. Documentation at :
Java HTTP Connector: /docs/config/http.html (blocking & non-blocking)
Java AJP Connector: /docs/config/ajp.html
APR (HTTP/AJP) Connector: /docs/apr.html
Define a non-SSL/TLS HTTP/1.1 Connector on port 8090
-->
<Connector port="8090" protocol="HTTP/1.1"
connectionTimeout="20000"
redirectPort="8443" />
<!-- A "Connector" using the shared thread pool-->
<!--
<Connector executor="tomcatThreadPool"
port="8090" protocol="HTTP/1.1"
connectionTimeout="20000"
redirectPort="8443" />
-->
<!-- Define a SSL/TLS HTTP/1.1 Connector on port 8443
This connector uses the NIO implementation that requires the JSSE
style configuration. When using the APR/native implementation, the
OpenSSL style configuration is required as described in the APR/native
documentation -->
<!--
<Connector port="8443" protocol="org.apache.coyote.http11.Http11NioProtocol"
maxThreads="150" SSLEnabled="true" scheme="https" secure="true"
clientAuth="false" sslProtocol="TLS" />
-->
<!-- Define an AJP 1.3 Connector on port 8009 -->
<Connector port="8009" protocol="AJP/1.3" redirectPort="8443" />
<!-- An Engine represents the entry point (within Catalina) that processes
every request. The Engine implementation for Tomcat stand alone
analyzes the HTTP headers included with the request, and passes them
on to the appropriate Host (virtual host).
Documentation at /docs/config/engine.html -->
<!-- You should set jvmRoute to support load-balancing via AJP ie :
<Engine name="Catalina" defaultHost="localhost" jvmRoute="jvm1">
-->
<Engine name="Catalina" defaultHost="localhost">
<!--For clustering, please take a look at documentation at:
/docs/cluster-howto.html (simple how to)
/docs/config/cluster.html (reference documentation) -->
<!--
<Cluster className="org.apache.catalina.ha.tcp.SimpleTcpCluster"/>
-->
<!-- Use the LockOutRealm to prevent attempts to guess user passwords
via a brute-force attack -->
<Realm className="org.apache.catalina.realm.LockOutRealm">
<!-- This Realm uses the UserDatabase configured in the global JNDI
resources under the key "UserDatabase". Any edits
that are performed against this UserDatabase are immediately
available for use by the Realm. -->
<Realm className="org.apache.catalina.realm.UserDatabaseRealm"
resourceName="UserDatabase"/>
</Realm>
<Host name="localhost" appBase="webapps"
unpackWARs="true" autoDeploy="true">
<!-- SingleSignOn valve, share authentication between web applications
Documentation at: /docs/config/valve.html -->
<!--
<Valve className="org.apache.catalina.authenticator.SingleSignOn" />
-->
<!-- Access log processes all example.
Documentation at: /docs/config/valve.html
Note: The pattern used is equivalent to using pattern="common" -->
<Valve className="org.apache.catalina.valves.AccessLogValve" directory="logs"
prefix="localhost_access_log" suffix=".txt"
pattern="%h %l %u %t "%r" %s %b" />
<Context path="/webMal" docBase="C:\webShop" reloadable="true" />
</Host>
</Engine>
</Service>
</Server>
CONTROL + F > 8090 PORTNUMBER
<Context path = "/webMal" docBase="C:\webShop" reloadable="true" />
path = 주소창에 localhost:8090/webMal <<
docBase = "컨텍스트" 폴더
'JSP' 카테고리의 다른 글
| [JSP] 서블릿 페이지-> JSP페이지/ JSP 스크립트 요소 (0) | 2019.10.30 |
|---|---|
| [JSP]서블릿 (httpservlet) (0) | 2019.10.30 |
| [JSP] POST 방식과 getParameterValues (0) | 2019.10.07 |
| [JSP] 이클립스에서 import javax.servlet에 오류 날 때 (0) | 2019.10.02 |
| [JSP] GET방식 전송 (0) | 2019.10.02 |